

Simplifying Machine Learning Deployment with Azure’s Managed Endpoints
This blog post was written jointly by Gavita Regunath, Principal Data Scientist at Advancing Analytics and Kunal Arora, Cloud Solution Architect at Microsoft and published on Tech Net UK
Deploying machine learning models in the cloud is becoming more crucial as businesses utilise artificial intelligence (AI) and machine learning (ML) to gain a competitive edge. However, with so many options available, it can be very difficult to know where to start when it comes to getting your models deployed to the cloud.
To generate predictions from a machine learning model, there are two main approaches: real-time (online) inference and batch (offline) inference. Real-time inference involves generating predictions in real-time, while batch inference generates predictions based on a batch of observations.

The method of deploying machine learning models will vary depending on whether the use case is real-time or batch inference. Options for deployment in the cloud include managed online endpoints, Kubernetes online endpoints, Azure Container Instance, and Azure Functions. The right choice will depend on the specific needs of your project.
In this article, we will take a closer look at managed online endpoints and explore its features and benefits. Whether you are new to machine learning or are looking to deploy your models, this article will provide an introduction and step-by-step guide to help you get started with managed online endpoints using Azure Machine Learning Studio. We will develop a machine learning model using Azure AutoML and demonstrate how to deploy the trained model to an online endpoint.
Managed Endpoints – What are they?
Managed endpoints is a fully managed service provided by Microsoft Azure that allows for quick and easy deployment of machine learning models in the cloud.
With managed endpoints, you do not need to worry about the technical details of deploying the models. Typically when deploying models for real-time or online inference, you would need to prepare and specify a scoring script, environment and infrastructure. Instead, Azure takes care of all of this for you allowing you to deploy models in a turnkey manner without worrying about infrastructure and environment setup.
Understanding the Key Components of Managed Endpoints
Endpoints
An endpoint in Azure Machine Learning is a URL that allows you to access a machine learning model and make predictions. There are two types of endpoints: online endpoints and batch endpoints. Online endpoints provide real-time predictions, meaning you can receive a prediction response immediately after sending a request to the endpoint. Batch endpoints, on the other hand, allow you to send a batch of requests for predictions, which can be processed in parallel and returned as a batch of predictions.
Online Endpoints
In Azure, online endpoints come in two forms: managed online endpoints and Kubernetes online endpoints. Managed online endpoints are designed to make deployment simple, with Azure handling all the technical details. Kubernetes online endpoints provide more control and customisation, as they allow you to deploy models and serve online endpoints on your own fully configured and managed Kubernetes cluster, with support for CPUs or GPUs. The differences between the two options are detailed here.
Online endpoint deployment is ideal for applications that require real-time predictions, such as fraud detection, predictive maintenance, personalisation and predictive pricing.

Deployments
Deployment in Azure Machine Learning involves taking a trained and tested machine learning model and making it available for real-world use through a production environment. Azure handles the necessary infrastructure setup and configurations, providing an endpoint for accessing the model.
Each endpoint in Azure Machine Learning can host multiple deployments, allowing you to deploy different versions of a machine learning model or multiple models for different purposes. One way to visualise multiple deployments on a single endpoint is to think of an endpoint as a website, and each deployment as a different web page on the site. The endpoint provides a single URL that can be used to access any of the web pages hosted on the site.
An online endpoint can do load balancing to give any percentage of traffic to each deployment. This means that you can direct a specific percentage of incoming prediction requests to each deployment, allowing you to test and compare the performance of different versions of a machine learning model or to gradually roll out a new model to production. For example, the diagram shows an online endpoint with two models. Model 1 is configured to have 60% of incoming traffic while Model 2 has 40% of the remaining traffic.
Importance of Azure managed online endpoints in cloud computing
Azure Managed Online Endpoints provides several benefits. These are:
Automatic Scaling: The service automatically scales up or down based on demand, ensuring that the deployed models can handle a large number of incoming requests without downtime.
Monitoring and Security: Azure Managed Online Endpoints provides monitoring and security features to help maintain the health and security of deployed models.
User-friendly Interface: The service provides a simple and user-friendly interface, making it easy to deploy and manage machine learning models.
Faster Time-to-market: This can lead to faster time-to-market and improved reliability and security.
Setting up Azure managed online endpoints
Details on prerequisites, limitations and cost
1. Prerequisites
An Azure account with an active subscription. Create an account for free.
An Azure Machine Learning workspace with a compute cluster (Minimum number of nodes as 0 and Maximum number of nodes as 1 or higher).
Basic knowledge of Azure services and Machine learning.
2. Limitations
Azure ML can have a maximum of 50 managed online endpoints per subscription. See Manage and increase quotas for resources with Azure Machine Learning for other limitations.
The number of deployments per endpoint is limited to 20. If you reach the limit, you will need to either delete an existing deployment or create a new endpoint.
3. Cost
There is no additional charge to use Azure Machine Learning. However, along with compute, you will incur separate charges for other Azure services consumed, including Azure Blob Storage, Azure Key Vault, Azure Container Registry and Azure Application Insights. See the Azure Machine Learning pricing for more information.
Step-by-step guide on how to create and configure Azure managed online endpoints
We have put together a step-by-step guide, complete with images, on how to create and configure Azure Managed Online Endpoints using Azure Machine Learning Studio. We aim to demonstrate how quickly and easily you can deploy your machine learning models using managed online endpoints.
For this walkthrough, we will be looking at a Banking dataset that is available to download here. The dataset contains information about the direct marketing campaigns conducted by a Portuguese banking institution. The campaigns were executed through phone calls, to promote their financial product (bank term deposit) to potential customers. The data includes details such as the number of times a customer was contacted during a campaign, the outcome of the campaign (whether the customer subscribed to the product or not), and various demographic and socio-economic factors of the customers, such as their age, job, marital status, etc.
We will build a machine learning model using Azure Automated ML to predict whether a customer is likely to subscribe to the bank’s term deposit product. By doing so, the bank can reduce marketing costs and increase their return on investment by focusing their efforts on customers who are more likely to subscribe. Since quick predictions are crucial for a busy bank, we’ll be deploying the model for real-time inference.
Developing a machine learning model
Getting Started with Azure Machine Learning
1.Sign into Microsoft Azure, open Azure Machine learning service, select the workspace (that was created as part of the prerequisites) and launch the studio.
2. In the left pane, select Automated ML under the Author section.
3. Select +New automated ML job

Create and select data asset
4. Under the Select data asset section, select + Create, give a name to the dataset such as BankData and provide an optional description. The automated ML interface currently only supports TabularDatasets, so the dataset type should default to Tabular. Select Next on the bottom left.
5. Under the Choose a source for your data asset section, select From local files and select Next.
6. In the Select a datastore section, select the default datastore that was automatically set up during your workspace creation, workspaceblobstore (Azure Blob Storage). This is where you’ll upload your data file to make it available to your workspace. Select Next.
7. Under Choose a file or folder section, select Upload and choose Upload files.
8. Choose the bankmarketing_train.csv file on your local computer. This is the file you downloaded from here and is the dataset which will be used for training our model. Select Next.
9. Under Settings, make sure the Data preview shows an accurate view of the data and select Next.
10. In the Schema section, you can change the datatype of the columns or choose to exclude some columns from the data asset. For this example, select the toggle switch for the day_of_week, to not include it. Select Next.

11. Review all the settings and select Create to complete the creation of your dataset.
12. This will re-direct you to the Select data asset section where you can select the newly added data asset, which is BankData in our case. Select Next. (If for any reason the data asset is not visible, a refresh might be needed).
Configure job
13. Under the Experiment name section of Configure job, select Create New and provide a name for the experiment such as Bank-automl-experiment.
14. Select y as the target column for what you want to predict. This column indicates whether the client subscribed to a term deposit or not.
15. Select compute cluster as your compute type, select the cluster you spun up as part of the prerequisites and select Next. (If you don’t see compute cluster, then create one by clicking on +New and following the instructions on-screen).

Select task and settings
16. Under the Select task and settings section, complete the setup for your automated ML experiment by specifying the machine learning task type and configuration settings.
17. Notice that the studio automatically selects the machine learning task type as Classification.
18. Select View additional configuration settings and populate the fields as follows. These settings are to better control the training job. Otherwise, defaults are applied based on experiment selection and data.


19. Select Save and Next.
Hyperparameter configuration
20. Under the Select the validation and test type section, select the Validation type as k-fold cross-validation and the Number of cross validations as 2.

21. Select Finish to run the experiment.

Training a machine learning model
22. The training can take up to 1 hour as we specified in our exit criterion. Take a break and come back to it after an hour.
23. In the left pane, select Jobs under the Assets section and select the name of the experiment, which is Bank-automl-experiment in our case.
24. Select the run display name which follows the adjective_noun_guid naming convention, such as yellow_shirt_l0cmj0qh. This will show you the status, duration and other details.

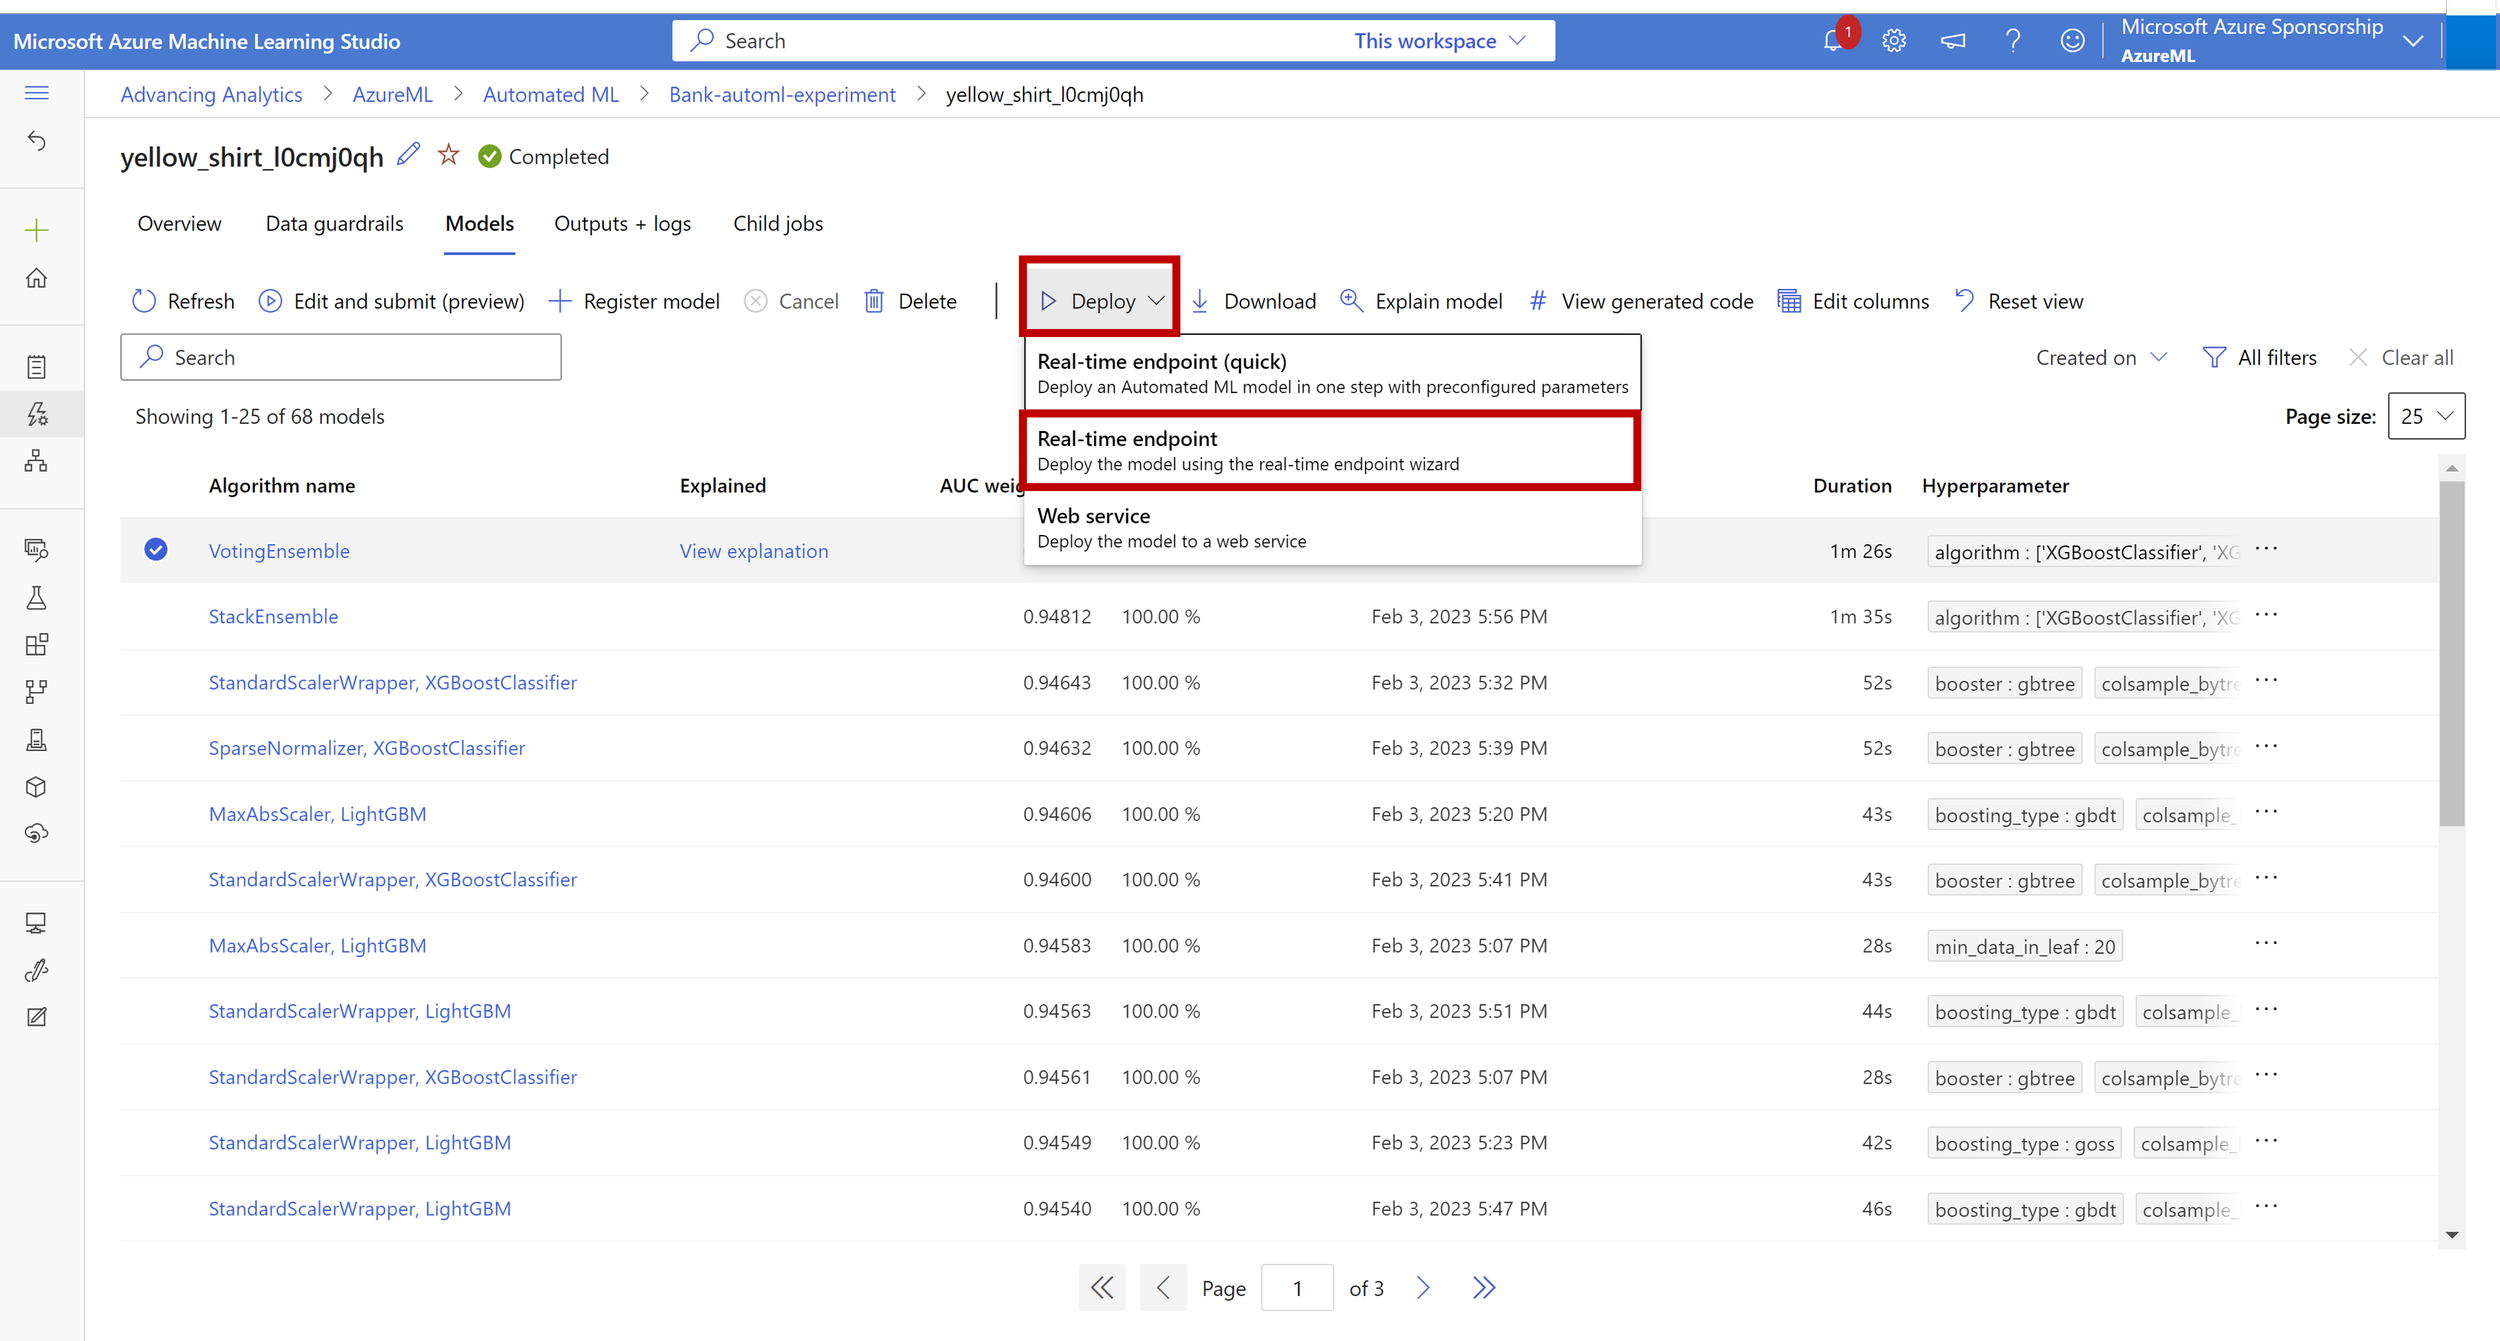
25. Select the Models tab which shows the ML algorithms used as part of the experiment run along with their AUC_weighted value, which is the evaluation metric. You can select a specific model and choose Explain model. Model explanation refers to the ability to understand and interpret the decisions made by a machine learning model. This includes understanding how the model uses inputs to make predictions and the factors that contribute to its predictions.
Deploying a model to an online endpoint
1.Select the model that you’d like to deploy. In this case, we will select VotingEnsemble which has the highest AUC weighted value, click into Deploy, and from the drop-down options choose Real-time endpoint.
2. Enter a unique name for the endpoint name. We recommend creating a unique name with the current date/time to avoid conflicts, which could prevent your deployment.
3. We used the default, Key-based authentication method, but there are two authentication modes you can choose from. These are Token-based authentication, where the token is periodically refreshed, or Key-based authentication (the default), which provides a key that does not expire.
4. Enter a Deployment name. Here, we have named this deployment blue.
5. Next, choose the compute where the environments and inference code for the endpoints will be deployed. For this endpoint, we selected a “Standard_DS3_v2” VM as it was sufficient for this use case. The instance count determines how many machines are running at deployment, which we have set to 1.
If you run into ‘Not enough quota’ error messages, then you would need to submit a support request to increase your quote as is explained in the documentation.
6. Ensure that Enable Application Insights diagnostics and data collection is selected to be able to monitor the deployment. Then, select Create. Note that Endpoint creation and deployment via the UI could take about 5-10 minutes.
7. Now you have a model that has been deployed for real-time inference. You can access your online endpoints on the Endpoints page to find critical information including the endpoint URI, status, testing tools, activity monitors, deployment logs, and sample consumption code.
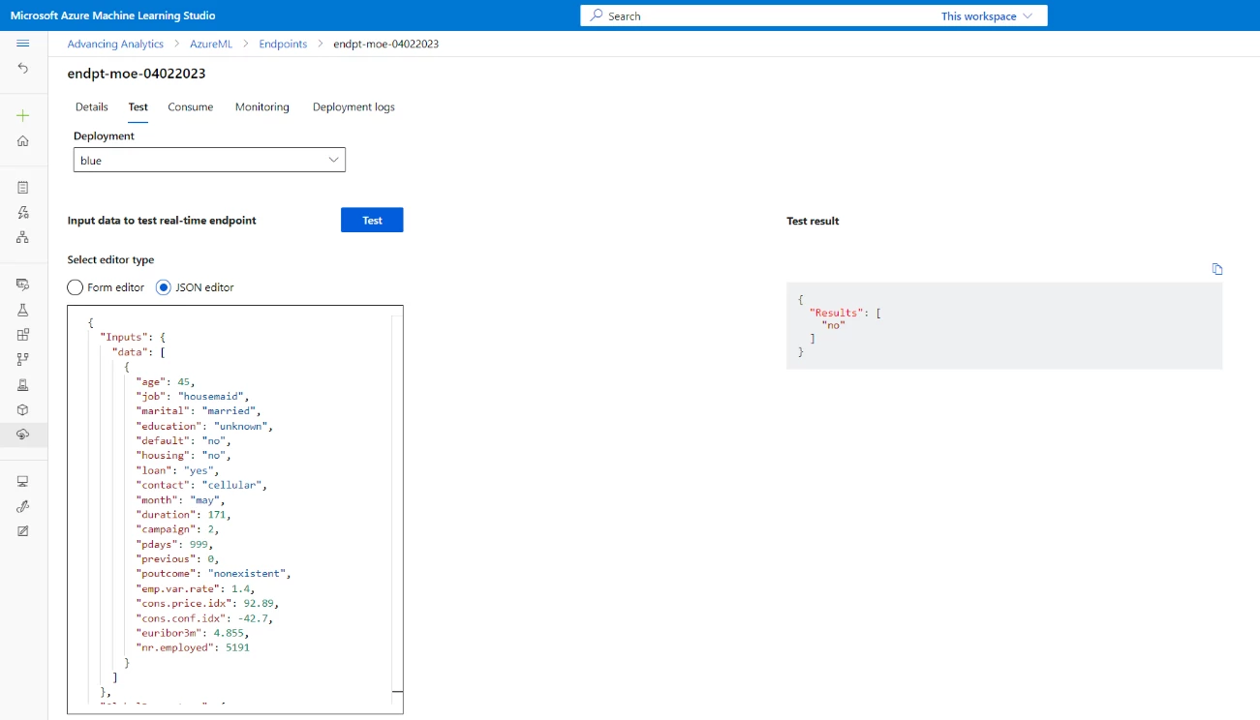
Test the endpoint with sample data
8. You can test this by going to the Test section, providing values for the features and getting the prediction/output. As an example, we provided the below input data using JSON editor and got the prediction as ‘no’ meaning this customer might not subscribe to the fixed term deposit.
{
  "Inputs": {
    "data": [
      {
        "age": 45,
        "job": "housemaid",
        "marital": "married",
        "education": "unknown",
        "default": "no",
        "housing": "no",
        "loan": "yes",
        "contact": "cellular",
        "month": "may",
        "duration": 171,
        "campaign": 2,
        "pdays": 999,
        "previous": 0,
        "poutcome": "nonexistent",
        "emp.var.rate": 1.4,
        "cons.price.idx": 92.89,
        "cons.conf.idx": -42.7,
        "euribor3m": 4.855,
        "nr.employed": 5191
      }
    ]
  },
  "GlobalParameters": {
    "method": "predict"
  }
}
Add another deployment to a managed online endpoint
9. If you have another model that you wanted to deploy to the existing endpoint, this can be done easily by following the steps detailed in Create a managed online endpoint. However, instead of creating a new endpoint, you would choose Existing endpoint and provide a different deployment name, for example green.
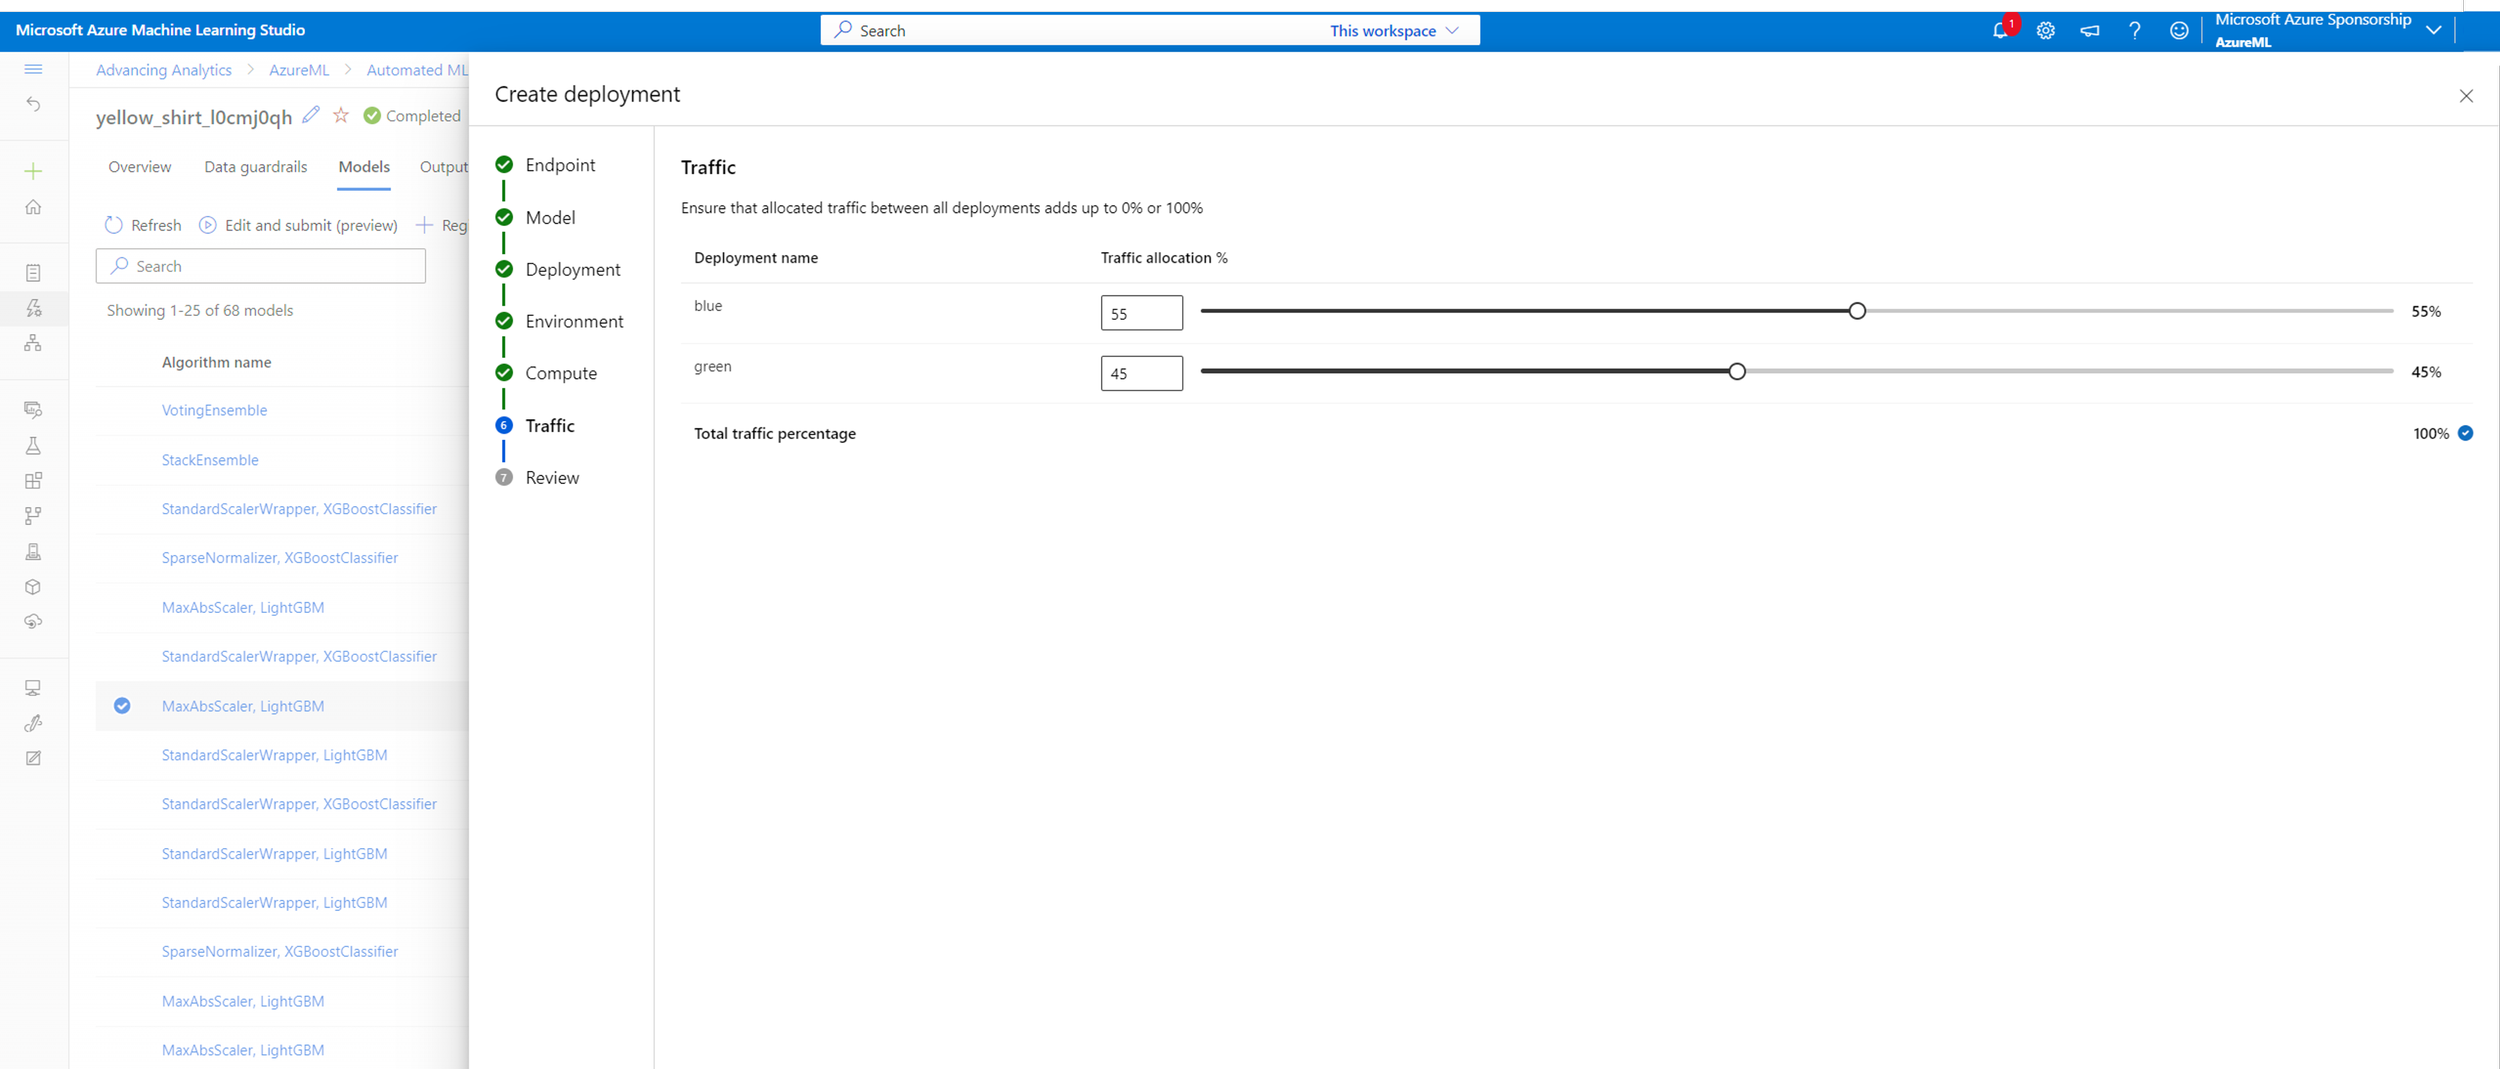
Adding additional deployments to an endpoint provides the ability to distribute incoming traffic through load balancing, which can improve the performance, reliability, and availability of the application.
Autoscaling
10. There is an autoscaling functionality that provides two options; you can choose to scale your resource manually to a specific instance count, or via a custom Autoscale policy that scales based on metric(s) thresholds. This is an extremely useful feature that enables your resource to be performant and cost-effective by adding and removing instances based on demand. You can choose how to best scale your resource by navigating to the endpoint, and then selecting ‘Configure auto scaling’.

Clean up resources
11. If you’re not going to use the endpoint, delete it to stop using the resource. Make sure no other deployments are using an endpoint before you delete it. Clean up would include deleting the endpoint, compute cluster and other resources that were spun-up as part of this tutorial.
Conclusion
This article discusses the deployment of machine learning models in the cloud using managed online endpoints in Azure Machine Learning Studio. Managed endpoints are a fully managed service that provides easy deployment of machine learning models without worrying about technical details. The article explains the key components of managed endpoints, including endpoints and deployments, and how to create and configure managed online endpoints using Azure Machine Learning Studio. Hopefully, by following this article, you can deploy your machine learning models on a managed online endpoint in Azure.
Learn more
Microsoft Azure’s official documentation provides a comprehensive guide to using Azure Managed Online Endpoints.
The Azure community forums are a good place to ask questions and connect with other users who are working with the service.