This article originally appeared on Medium.com and is republished with permission from the author.
This article will demonstrate how to configure Apache Spark with FlashBlade NFS and S3. Part two will cover how to build a data science environment with Spark and FlashBlade®. Code examples are in my companion GitHub repository.
Introduction
Apache Spark is a key tool for data science, analytics, and machine learning with support for structured streaming and high-level languages like Python, R, and SQL. While the original Spark design focused on performance improvements over MapReduce, it has now evolved into a general purpose data science platform with built-in libraries for machine learning and graph processing. Spark pulls data sets from a variety of sources and is happily agnostic to where and how that data is stored and accessed. Files, objects, document stores, or databases can all provide input or output storage for Spark.
A powerful data science environment needs to enable both production data pipelines and ad hoc experimentation and analysis. This means high-performance data access as well as flexible and agile clusters to enable rapid iteration and experimentation.
We present an alternative to the legacy HDFS architecture which couples compute and storage infrastructure, resulting in metadata bottlenecks at the NameNode, as well as rigid and inflexible scaling. Instead, a shared storage architecture disaggregates the compute and storage infrastructure using modern object storage protocols (S3) or tried-and-true shared filesystems (NFS). This means more time can be spent in Spark and less time needs to be spent managing data placement, upgrades, and scaling.
- Simplify the management and maintenance of the cluster by separating compute and storage.
- Quickly scale either tier independently by adding just the compute or storage resources needed.
- Upgrade applications easily and independently with the ability to run and test multiple software versions on the same storage and data set.
- Consolidate multiple applications (not just Spark) on to the same storage infrastructure instead of separate silos of data.
FlashBlade provides performance, reliability, scalability, and simplicity along with the benefits of shared storage.
Goals
My goal is to demonstrate a data science environment with Spark and FlashBlade that allows users to focus on their data and analytics and not infrastructure or poor performance!
This post will cover:
- Configuration required to run Spark Standalone with NFS and S3
- Examples of automating common Spark cluster tasks
- Performance testing with a simple machine learning workload
Spark Without Hadoop!
It is possible to run Spark without having to install, configure, and manage Hadoop using Spark Standalone clusters and FlashBlade.
From the Spark FAQ:
Question: “Do I need Hadoop to run Spark?
Answer: No, but if you run on a cluster, you will need some form of shared file system (for example, NFS mounted at the same path on each node). If you have this type of filesystem, you can just deploy Spark in standalone mode.”
This document focuses on the Standalone cluster mode because it reduces the number of dependencies and simplifies operation; there is no need to deal with the complexities of managing HDFS and YARN.
Configuring Apache Spark Access to Storage
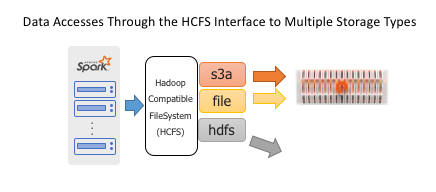
Spark is an analytics tool, delegating the task of reading and writing to persistent storage using the Hadoop Compatible FileSystem API.
Object stores are currently the most popular form of shared storage for Spark, eclipsing HDFS because of scalability and the advantages of disaggregated storage. Adaptor libraries like S3A enable the object store to present the necessary filesystem semantics and meet the requirements of HCFS to seamlessly fit into Spark workflows.
The FlashBlade’s high performance and scale-out NFS implementation is also uniquely well-suited for a Spark data store. To use an NFS filesystem, no additional code is required beyond the standard POSIX filesystem interfaces included in the JVM.

A Spark job can use both NFS and S3 at the same time or even incorporate NFS and S3 with legacy HDFS clusters. The FlashBlade can concurrently support a mix of users on both protocols.
The configurations below were tested with Purity//FB version 2.3.0 and Apache Spark versions 2.3.2 and 2.4.0. For details on how to install Spark and dependencies, please refer to the associated Dockerfile.
Configuring NFS
Step 1: Create Filesystem
The FlashBlade CLI commands to create a filesystem and enable NFS access are below. Alternatively, the UI or REST API can be used to create a filesystem.
pureuser@flashblade:~$ purefs create —-size 100T datahub
…
pureuser@flashblade:~$ purefs add --protocol nfs datahub
Name Size Used Created Protocols
datahub 100T 0.00 2019–01–03 03:38:53 PDT nfs
Step 2: Mount Filesystem
The shared NFS filesystem should be mounted at the same location on all worker nodes.
Edit /etc/fstab on each host to add the mount point and ensure the mounts reappear after a reboot.
flashblade01.foo.com:/datahub /datahub nfs rw,nfsvers=3,intr,_netdev 0 0
Now all worker nodes have access to a shared filesystem, just as though it were HDFS or S3A. Spark already has the logic built in to share the common filesystem, preventing workers from clobbering over each other.
Alternative approaches to ensuring the filesystem is mounted include using the docker volume plugin (demonstrated here) or ansible module.
Step 3: Access from Spark
To use NFS for data accesses, input and output paths should point to the location on NFS. To differentiate from other filesystems, prepend the path with the URI “file:/” to make the location explicit. For example, both commands below access data via NFS:
val input = sc.textFile(“file:/datahub/input-dir/”)
// With no URI, “file:/” is inferred.
outputRDD.saveAsSequenceFile(“/datahub/output-dir”)
Below is an example of the output of saving an RDD with 50 partitions to shared storage:
ir@joshua:~$ ls -l /datahub/Spark-Output/
total 73549081
-rw-r — r — 1 ir ir 1506358621 Sep 12 13:30 part-00000
-rw-r — r — 1 ir ir 1505915945 Sep 12 13:30 part-00001
-rw-r — r — 1 ir ir 1506723117 Sep 12 13:30 part-00002
-rw-r — r — 1 ir ir 1506507232 Sep 12 13:30 part-00003
-rw-r — r — 1 ir ir 1505983628 Sep 12 13:30 part-00004
.
.
.
-rw-r — r — 1 ir ir 1506270906 Sep 12 13:30 part-00048
-rw-r — r — 1 ir ir 1506032424 Sep 12 13:30 part-00049
-rw-r — r — 1 ir ir 0 Sep 12 13:30 _SUCCESS
Note that the output RDD is actually 50 different files, which allows 50x more concurrency when writing the output from Spark workers without requiring the use of unscalable filesystem locking.
Configuring S3
The Hadoop S3A client support was introduced in Hadoop 2.7 and allows Hadoop compatible applications to use an S3 object store with the expected filesystem semantics. The primary advantage of S3A is that it avoids requiring any application changes to switch from HDFS to S3. There have been significant improvements to the S3A client in more recent versions, for example, improving support for “rename” operations.
Step 1: Add AWS S3A Jars to Classpath
For licensing reasons, the Apache Spark distribution does not currently include the S3A jars.
The following commands download Hadoop 2.7.3, extract the S3A jars from the package, and then copy them into the Spark jar path.
> wget -P /tmp \ https://archive.apache.org/dist/hadoop/core/hadoop-2.7.3/hadoop-2.7.3.tar.gz
> tar xf /tmp/hadoop-2.7.3.tar.gz \ hadoop-2.7.3/share/hadoop/tools/lib/hadoop-aws-2.7.3.jar hadoop-2.7.3/share/hadoop/tools/lib/aws-java-sdk-1.7.4.jar
> mv hadoop-2.7.3/share/hadoop/tools/lib/*.jar spark-$VERSION/jars/
Hadoop 2.7 is downloaded to match with the most common form of Apache Spark distribution “Pre-built for Hadoop 2.7 and later.” The need to add S3A jars is required regardless of which type of S3 storage backend is used.
Step 2: Configure FlashBlade Object Store
Create account, user, access keys, and bucket.
To create users and keys via the CLI, first log in to FlashBlade using the management VIP address and administrator username/password.
Create the service account:
pureuser@irp210-c01-ch1-fm2> pureobjaccount create datascience
Name Created
ambari-user 2018–06–29 06:55:43 PDT
Create a user account:
pureuser@irp210-c01-ch1-fm2> pureobjuser create datascience/spark-user
Name Access Key ID Created
datascience/spark-user — 2018–06–29 06:56:44 PDT
Then, create a key:
pureuser@irp210-c01-ch1-fm2> pureobjuser access-key create --user datascience/spark-user
Access Key ID Enabled Secret Access Key User
PSFBIAZFDDAAGEFK True 254300033/a3e2/DF81E2……HLNAGMLEHO datascience/spark-user
Note that this is the only opportunity to view the secret key so ensure that it is recorded somewhere safe.
After creating the S3 service account and user, create a bucket for use.
pureuser@irp210-c01-ch1-fm2> purebucket create --account ambari-user datahub
Name Account Used Created Time Remaining
datahub default 0.00 2019–01–09 05:42:06 PST -
External tools and libraries, such as s3cmd and boto3, can also be used to create or remove buckets by using the access/secret key and FlashBlade data VIP to use the S3 API directly.
Step 3: Configure S3A
The S3A connector controls how the object store is accessed by the application. There are two ways to provide the necessary parameters: a configuration file and command-line options.
Option 1: Config File
The first option is a configuration file consisting of key value pairs. The default values for options are found at $SPARK_HOME/conf/spark-defaults.conf or overrides can be provided through the “ — properties-file” option.
Add the access key information. Warning: Be careful how this file is stored; access to the secret key gives someone else all control over your data!
spark.hadoop.fs.s3a.access.key=YYYYYYYY
spark.hadoop.fs.s3a.secret.key=XXXXXXXX
The S3A client connects to AWS servers by default. To connect to a FlashBlade instead, it is necessary to change the endpoint to any one of the FlashBlade’s data VIPs:
spark.hadoop.fs.s3a.endpoint=DATA_VIP
For simplicity, we disable SSL and use port 80 (HTTP) connections for sending S3 RPCs.
spark.hadoop.fs.s3a.connection.ssl.enabled=false
It is also possible to import an SSL certificate into the FlashBlade and use HTTPS, but that is not covered in this document.
The default FileOutputCommitter in Hadoop2.x does not currently behave well with S3 (AWS or FlashBlade) due to the inefficient way that it implements rename functionality. Use the newer, faster version 2 of FileOutputCommitter by adding the following property:
spark.hadoop.mapreduce.fileoutputcommitter.algorithm.version=2
The second version of the outputcommitter is the default in the Hadoop3.x release line and the newest Hadoop releases also include further improved committers for S3A to further increase performance of writes.
The fast-upload feature further improves performance when writing large objects:
spark.hadoop.fs.s3a.fast.upload=true
Option 2: Environment Variables
An alternative to specifying access keys in a config file is to use the environment variables supported by the AWS SDK.
export AWS_ACCESS_KEY_ID=XXXXXXXXX
export AWS_SECRET_ACCESS_KEY=YYYYYYYYYY
These keys only need to be available on the driver node, not on the Apache Spark master or workers.
Option 3: Command-line Arguments
The following command line shows how to supply the necessary configuration options to run a spark job. Configuration specified on the command line takes priority over configuration files, allowing to override specific options for each job.
./bin/spark-submit XXXYYYZZZ \
-Dfs.s3a.endpoint=10.61.59.208 \
-Dfs.s3a.connection.ssl.enabled=false \
-Dmapreduce.fileoutputcommitter.algorithm.version=2 \
-Dfs.s3a.fast.upload=true \
-Dfs.s3a.access.key=XXXXXXXXX \
-Dfs.s3a.secret.key=YYYYYYYYYYYYYYY \
s3a://bucketname/input \
s3a://bucketname/output
Please see this documentation for additional configuration options when using S3A, including the ability to specify endpoint and keys on a per-bucket basis to allow connecting to multiple object stores.
Step 4: Access from Apache Spark
To use S3 for data accesses in any Spark language, input and output paths should be prepended with the S3A URI for object data: “s3a://bucketname/input-dir”.
For example:
val input = sc.textFile(“s3a://bucketname/input-dir/”)
outputRDD.saveAsSequenceFile(“s3a://bucketname/output-dir”)
Node Local Storage (Optional):
Case 1: Intermediate Results
Intermediate storage is used for shuffle data and data sets that do not fit in memory. This temporary data introduces a new challenge to tune jobs to avoid overfilling this local space. Example operations that trigger shuffling are repartition, groupByKey, or join operation, each of which can run out of intermediate space if restricted to local storage only.
Instead, using shared storage for this data avoids needing to tune jobs or size nodes to fit large intermediate RDDs. Consequently, worker nodes can be truly stateless compute resources.
A common desire is to persist an expensive intermediate result to enable fast experimentation with the data, i.e., when it is faster to read back from storage than recompute. An example of persisting an intermediate RDD to persistent storage (instead of memory):
scala> interm_result.persist(StorageLevel.DISK_ONLY)
res14: interm_result.type = MapPartitionsRDD[2] at map at <console>:26
When an action is next performed on that RDD, the data will also be written to the intermediate storage location so that subsequent actions do not need to recompute.
Case 2: Centralized Logging
Apache Spark stores job log data to local storage by default, making it difficult to navigate the UI to find the necessary logs when debugging issues. Instead, storing log data in shared storage centralizes the information, enabling better tooling and support for finding logs when debugging.
Further, when running in Docker containers, this local storage is ephemeral and goes away with the container, meaning valuable log data could easily be lost.
By setting the following environment variable, the Spark master and workers will log to a common directory on the shared NFS datahub.
-e SPARK_LOG_DIR=/datahub/sparklogs \
-e SPARK_WORKER_DIR=/datahub/sparklogs
The difference between the two locations is subtle. The LOG_DIR contains the logs from the master or worker processes, whereas the WORKER_DIR contains the application stdout/stderr logs.
Automation Tip: Using the Pure Docker Volume Plugin
Configuring each worker to use shared storage for intermediate can be done by manually creating new filesystems or volumes and mounting them to each worker. But automation removes manual steps, enabling more rapid changes to the infrastructure and experimentation.
To automatically use shared storage for each worker’s node local storage, we utilize the Pure Docker Volume Plugin to automatically provision a volume or filesystem for node local storage. Ansible playbooks are an example of another tool that could automate this process.
To automatically provision local scratch space, we use the Pure Docker Volume Plugin to automatically create a new filesystem or volume for each node’s local space. This eliminates the need to manually do any provisioning or mounting for these local volumes.
The following command provisions a 1TB filesystem to create a docker volume named “sparkscratchvol,” assuming the plugin has been configured to connect to a FlashBlade.
docker volume create — driver=pure -o size=1TiB \
-o volume_label_selector=”purestorage.com/backend=file” \
sparkscratchvol
If a FlashArray™ device has been configured for the plugin, then a block device could alternatively be provisioned simply by replacing “file” with “block” in the above command.
To utilize this volume for scratch space, we volume map it into the worker container and point the Apache Spark parameters to it. A simplified version of the docker run command is below, with the relevant parts highlighted:
docker run -d — net=host \
-v sparkscratchvol:/local \
-e SPARK_LOCAL_DIRS=/local \
$SPARK_IMAGE /opt/spark/sbin/start-slave.sh spark://$MASTER:7077
For bare-metal or virtual machine servers, this same setup can also be achieved through directly mounting a filesystem at the “/local” mountpoint.
The second part of this blog post will go into more detail into automating the setup and deployment of Spark clusters, as well as demonstrate example analytics and ML workloads.
![]()


