

In this four-part series, I’ll explore using ActiveDR™ for managing Oracle disaster recovery.
Part 1 : Configure ActiveDR and protect your DB volumes (why and how)
Part 2: Accessing the DB volumes at the DR site and opening the database
Part 3 : Non-disruptive DR drills with some simple scripting
Part 4 : Controlled and emergency failovers/failbacks
One of the things I used to dread about supporting production systems in my earlier career as a DBA were the bi-annual DR drills.
Pulling myself out of bed and rolling into the office at 8am on a Saturday morning knowing I was in for a full day of complex failover testing to tick the regulator’s box was a bad start to the weekend. Going back to the office at 8am again on Sunday to fail everything back effectively ruined the weekend and more often than not was a stressful experience.
On one occasion a step was done out of order in the complex and lengthy set of manual instructions we had to follow and we couldn’t get a mission-critical database back up. A few of us ended up pulling an all-nighter to do a full restore on what was in those days a huge database. Fortunately, we got it back up by 6am on Monday, just in time for the trading floor to open so nobody lost their job, not on that day at least.
Suffice to say, it was not how I would have chosen to spend the weekend, especially when I knew my friends had been enjoying themselves and the beautiful weather in the beer garden of the local pub on one of the rare days of sunshine in a London summer.
I’m sure many DBAs have similar experiences, so if you’re one of them (or perhaps just interested in simplifying the complex process and cost/risk optimisation), then read on to learn a better way.
ActiveDR is a replication feature included with no additional cost on the FlashArray™ suite of block/file storage arrays. This includes FlashArray//C™ for capacity-optimized workloads, FlashArray//X™ for performance-optimized workloads, and the big boy FlashArray//XL™ for the most demanding low latency, large-scale consolidation workloads. It also works on Pure Cloud Block Store™ (you can think of this as a virtual FlashArray that runs on AWS/Azure to bring the enterprise storage features of the FlashArray, including data reduction, encryption, snaps/clones etc. to enhance and lower the cost of native cloud storage). You can read more about it in this post.
ActiveDR is simple to set up and easy to manage. The biggest plus point for me running Oracle databases is the ability to test your DR processes without actually having to failover and take a production outage.
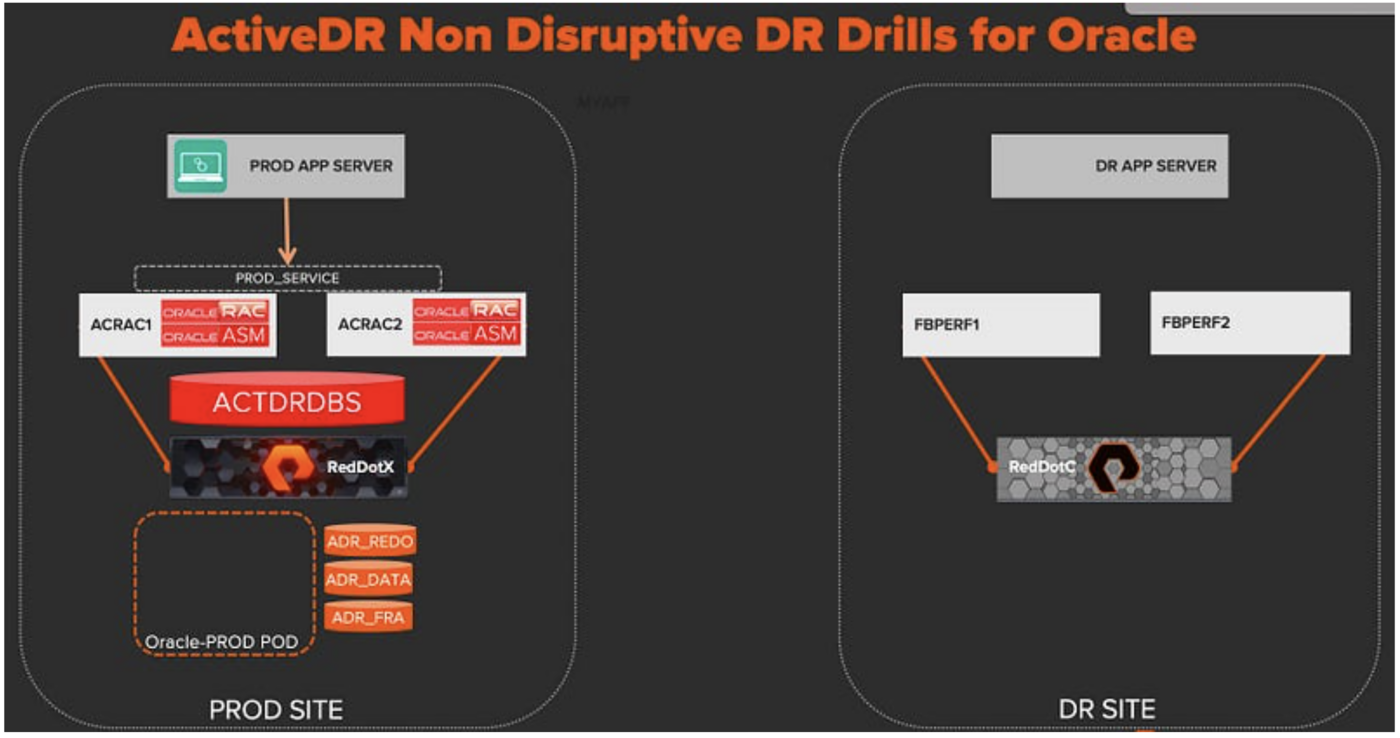
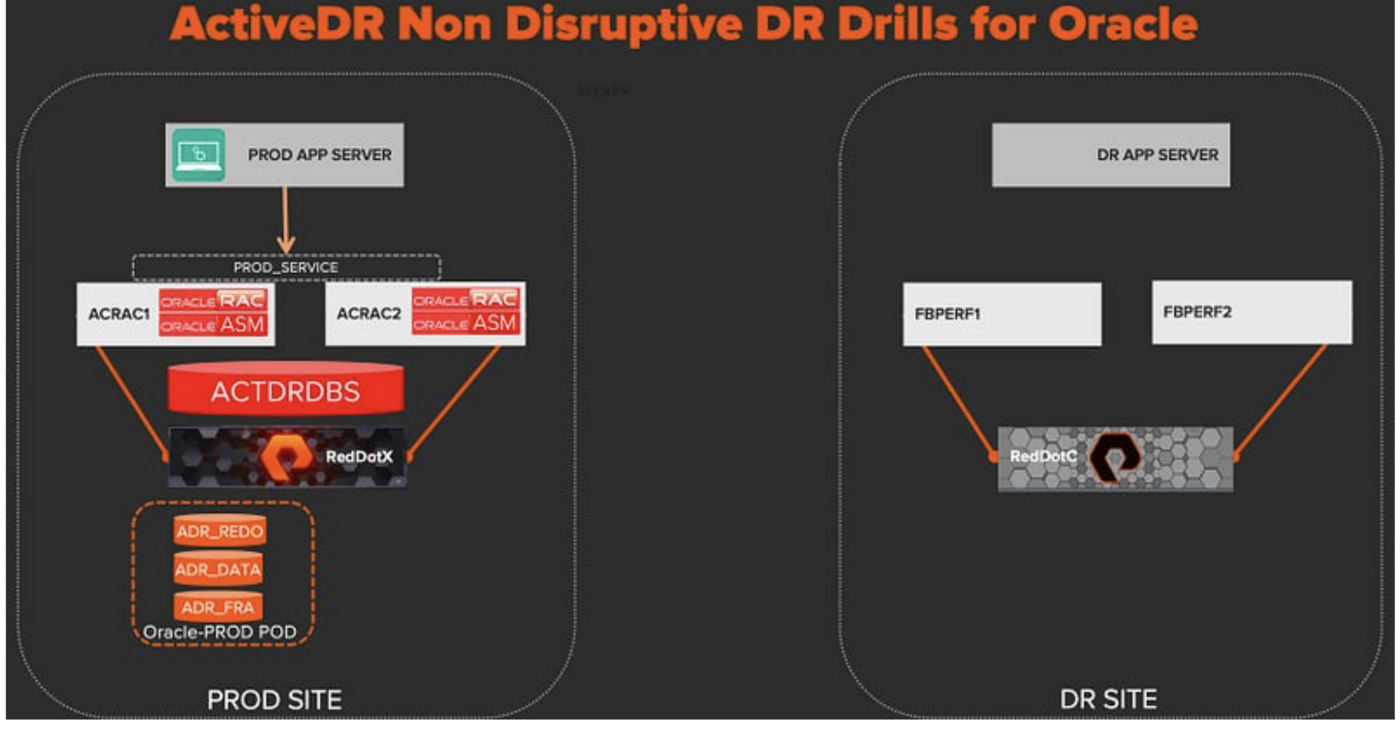
So let’s get started and take a look at a logical architecture diagram of what we’re about to build.
I already have my production database “ACTDRDBS” configured. It’s a two node RAC using ASM, and the shared storage block volumes are running on a FlashArray//X called “RedDotX.”
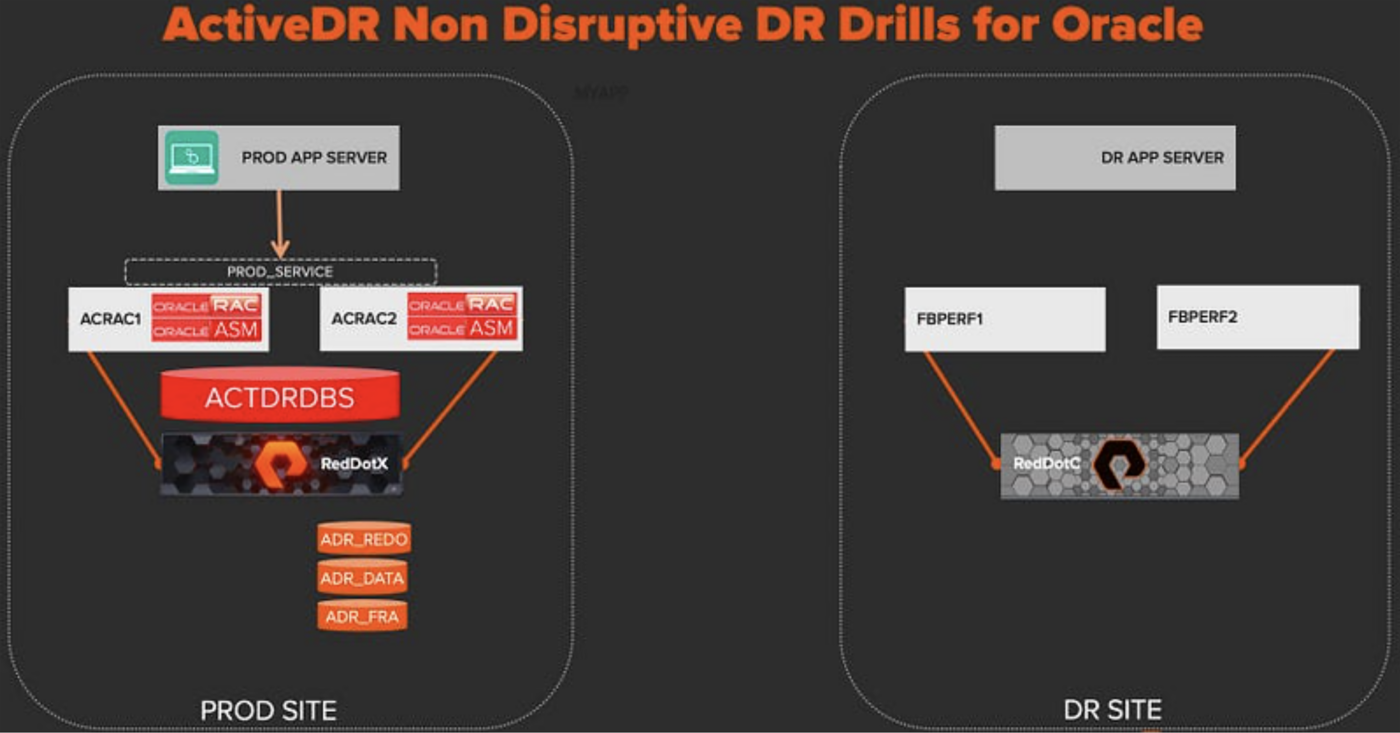
My DR site has two servers with the same OS and version of Oracle installed connected to a lower-cost FlashArray//C called “RedDotC.”
I’ll now show all the steps required to build a DR solution to protect the ACTDRDBS database. For the storage steps, I’ll show the Purity GUI and also the equivalent CLI commands for those who might want to script this.
First, we’ll need to create a replication connection between the PROD array and the DR array. Note this assumes we have network connectivity between the two sites and the in-built replication ports on each array are connected to the network.
On RedDotC (DR array), navigate to the Protection tab and use the menu on Array Connections to get the Connection key and copy to the clipboard:
purearray list --connection-key
On RedDotX (PROD array), navigate to the Protection tab and use the + button to add a new connection:
- Paste in the connection key and enter the IP address of the DR array.
- Select Async Replication and choose the transport (I’m using Ethernet for IP-based replication, but FC is also an alternative option).
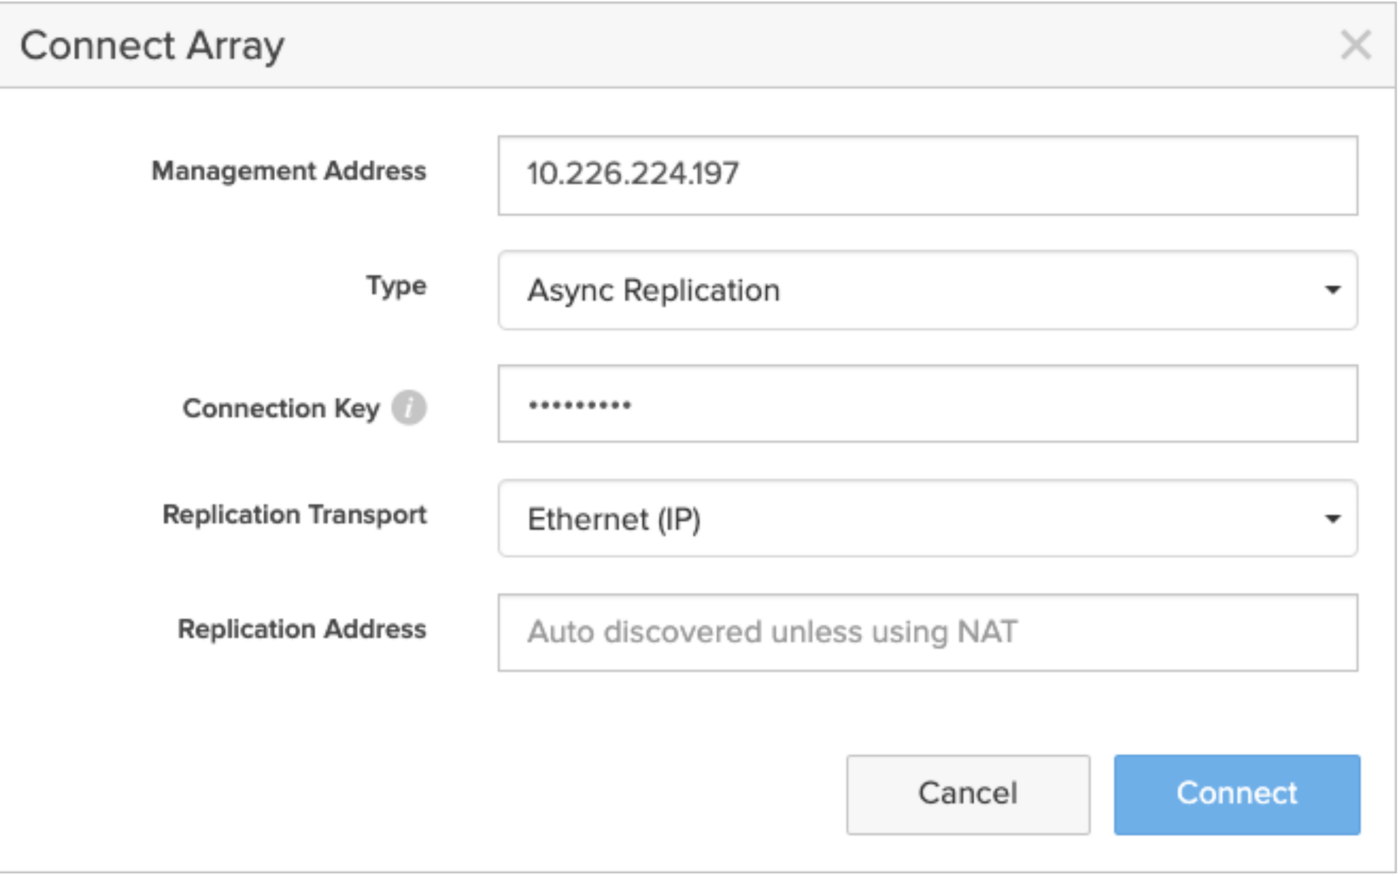
purearray connect --management-address ###.###.###.### --type async-replication \
--replication-transport ip --connection-key 1231-d23524f-2525-cccasets3r
I can now see the connection from my PROD array to the DR array “RedDotC.” Note: It’s possible to replicate from one array to multiple targets including other physical FlashArray systems, Pure Cloud Block Store, S3 on FlashBlade®, and S3 in the public cloud.

The next step is to create my ActiveDR pods. Unlike ActiveCluster™ where I have a single pod stretched between two arrays, ActiveDR requires a distinct pod on both arrays.
On the PROD array (RedDotX), navigate to the Storage > Pods tab and click the + symbol to create a new pod. This pod will store Oracle volumes on the PROD array so give the pod a suitable name
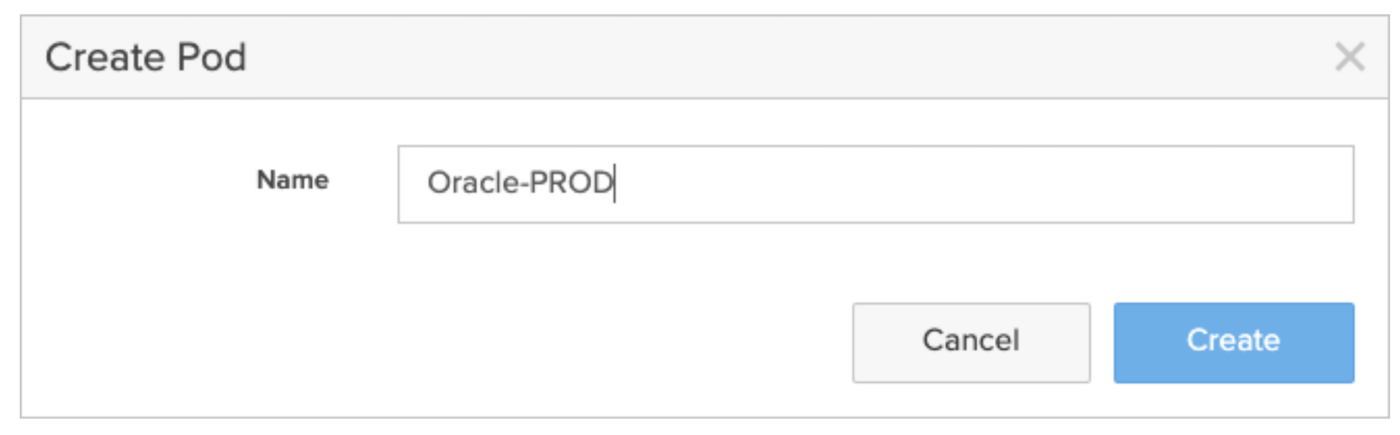
purepod create Oracle-PROD
Now I’m going to move the live database volumes into the Oracle-PROD pod. From the Storage > Pods tab, click the menu on the Volumes pane.
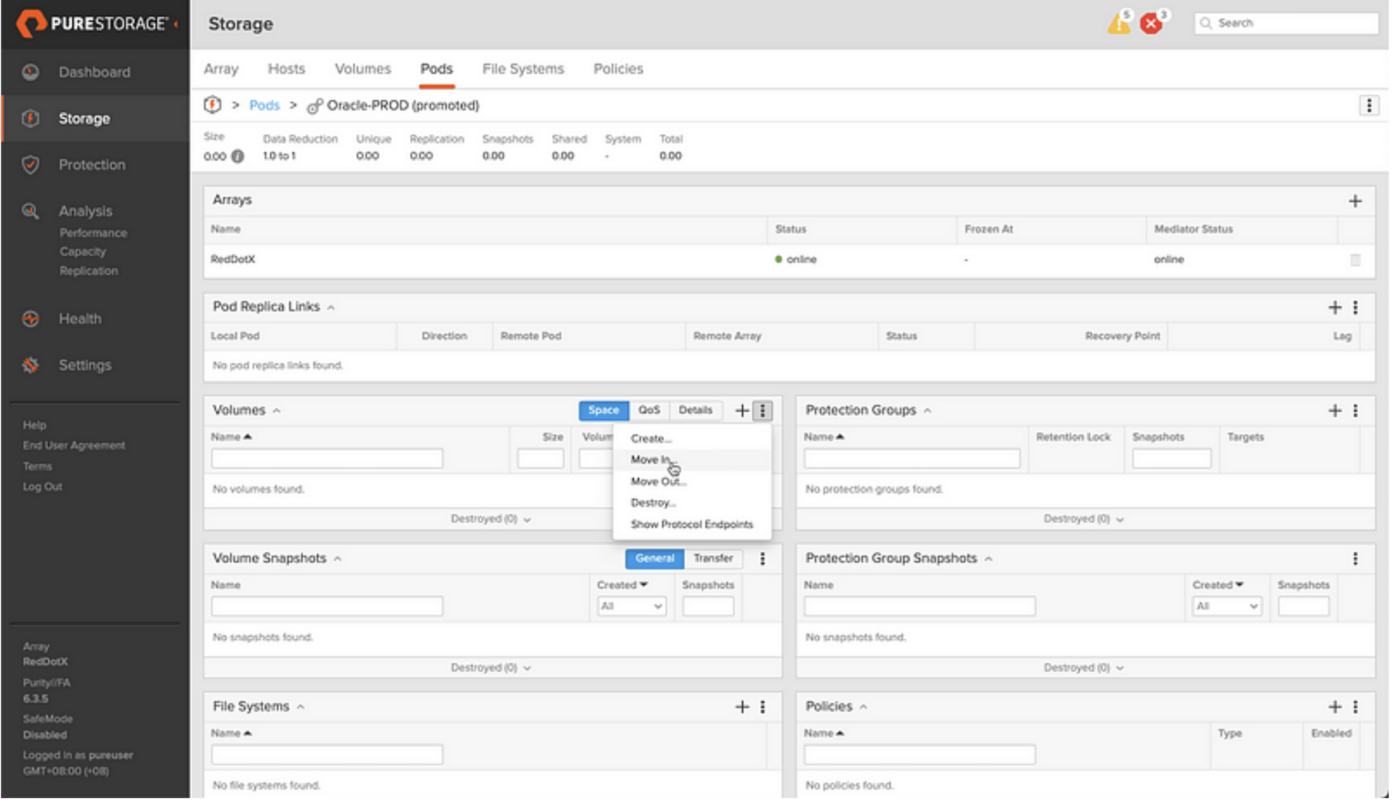
Use the filter function and search for the names of the volumes the database “actdrdbs” is running on, and then select them and hit the Move button.
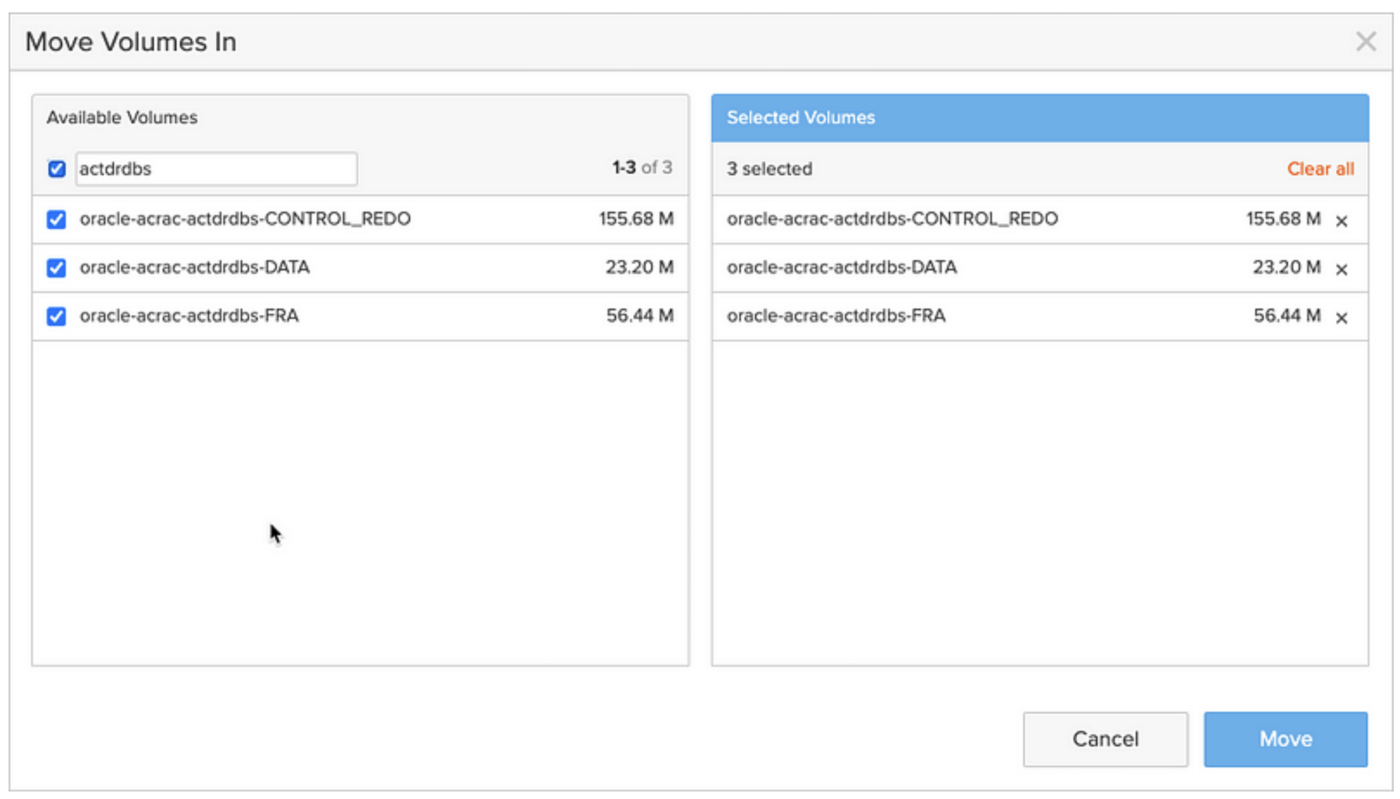
purevol move oracle-acrac-actdrdbs-CONTROL_REDO Oracle-PROD
purevol move oracle-acrac-actdrdbs-DATA Oracle-PROD
purevol move oracle-acrac-actdrdbs-FRA Oracle-PROD
Note: This can be done with the database running and does not require any downtime. At Pure, we don’t like any form of downtime and you’ll find everything from software upgrades to complete in-place refreshes of hardware to upgrade from current-gen to next-gen arrays can be done non-disruptively, eliminating the need for database migrations for storage refreshes (another of my pet peeves from my time as a DBA).
Now, I need to repeat the same steps on the DR array and create a pod that I’ll name “Oracle-DR.”
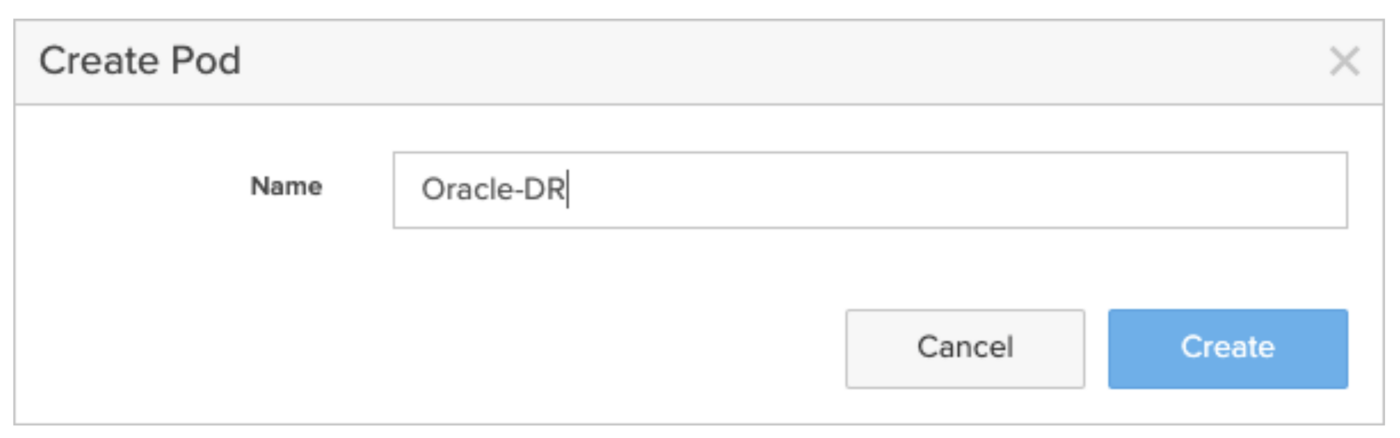
purepod create Oracle-DR
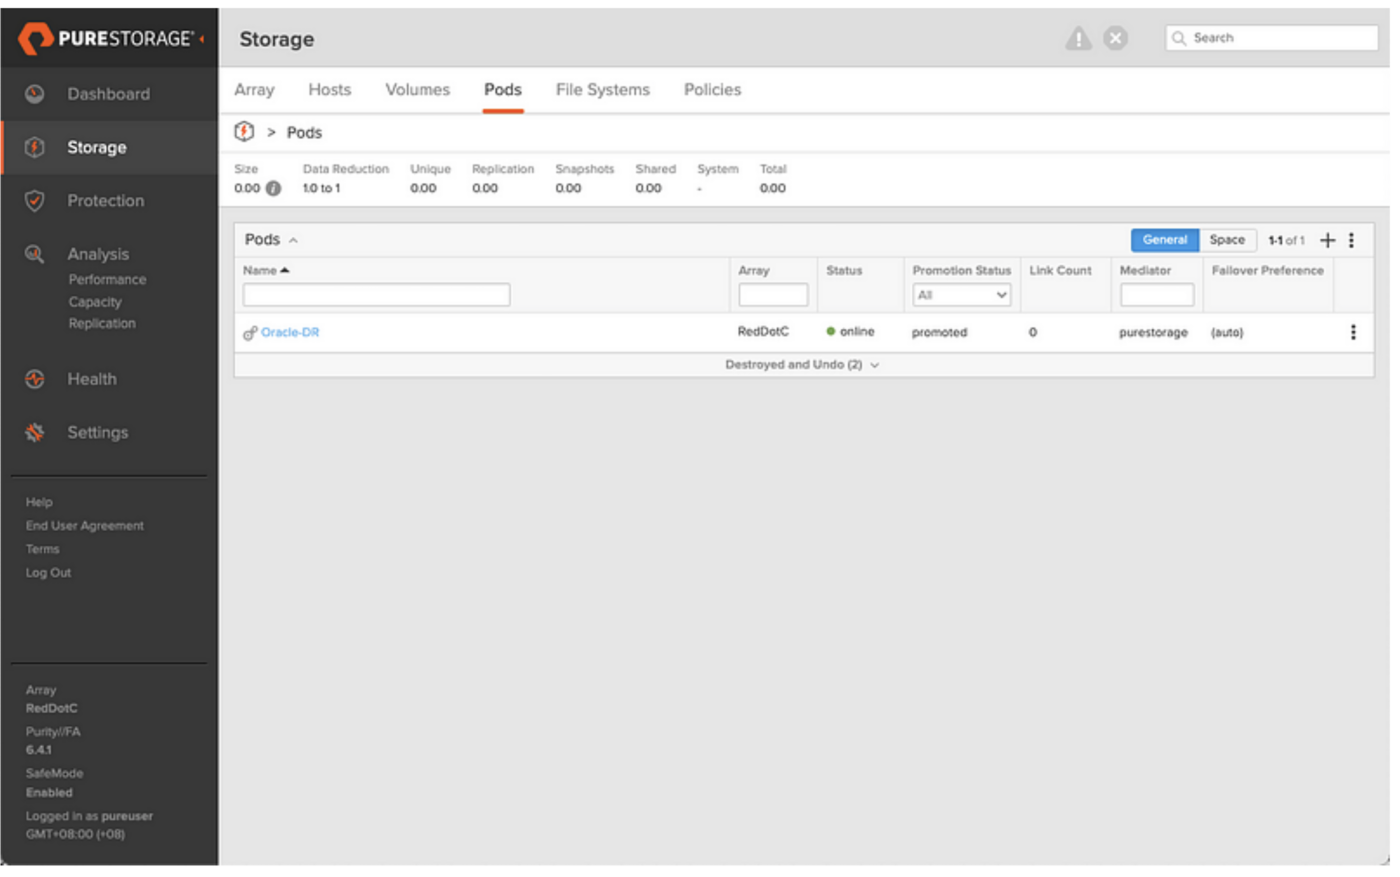
Notice that both the Oracle-Prod and Oracle-DR pods are created with a default status of “Promoted.” This means any volumes in the pod are available for read/write.
The next step is to create a replication link from the Oracle-PROD pod to the Oracle-DR pod, but as this is a one-way replication, only one pod can be promoted, so we need to demote the Oracle-DR pod making it read-only.
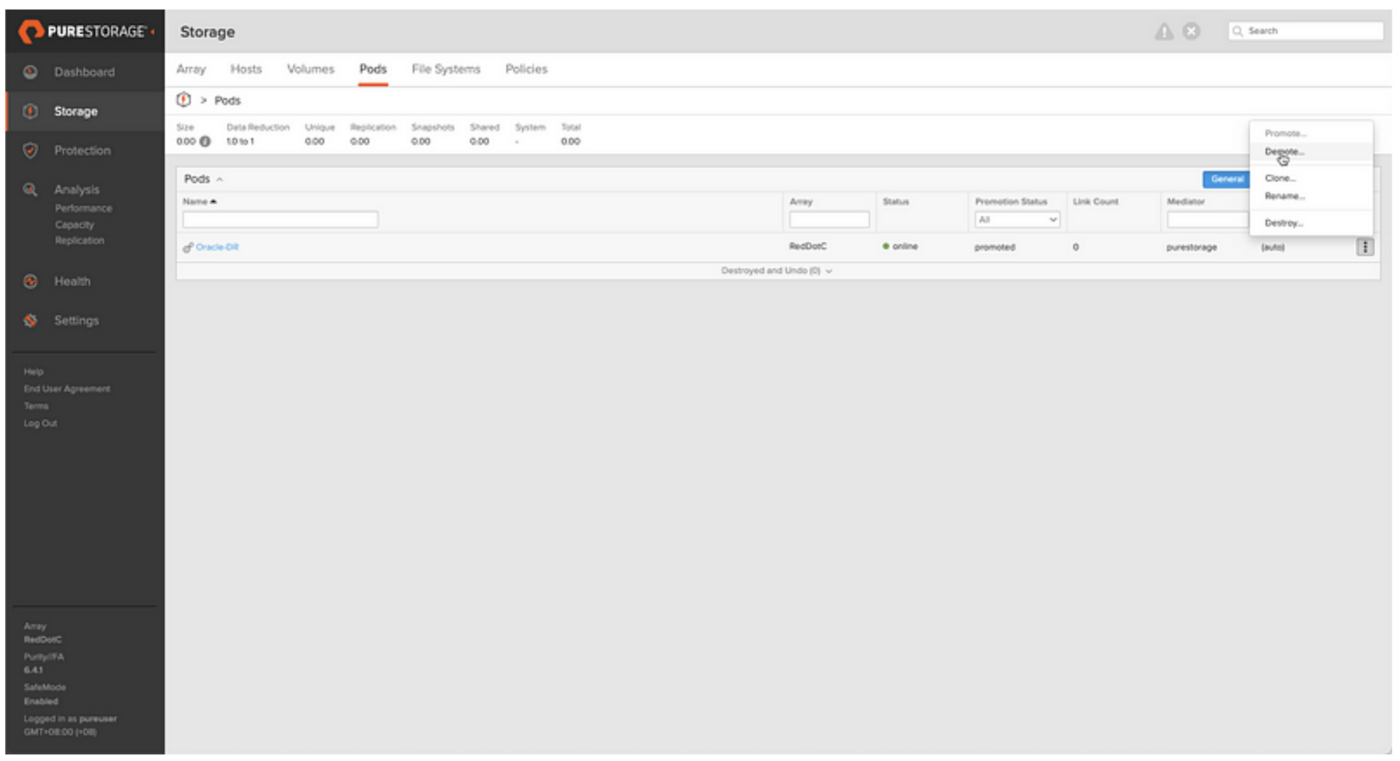
purepod demote Oracle-DR
Now that the Oracle-DR pod is demoted, we can form a replication link between Oracle-PROD and Oracle-DR pods. On the PROD array, navigate to the Storage > Pods > Pod Replica Links pane and click the + symbol to create the link.
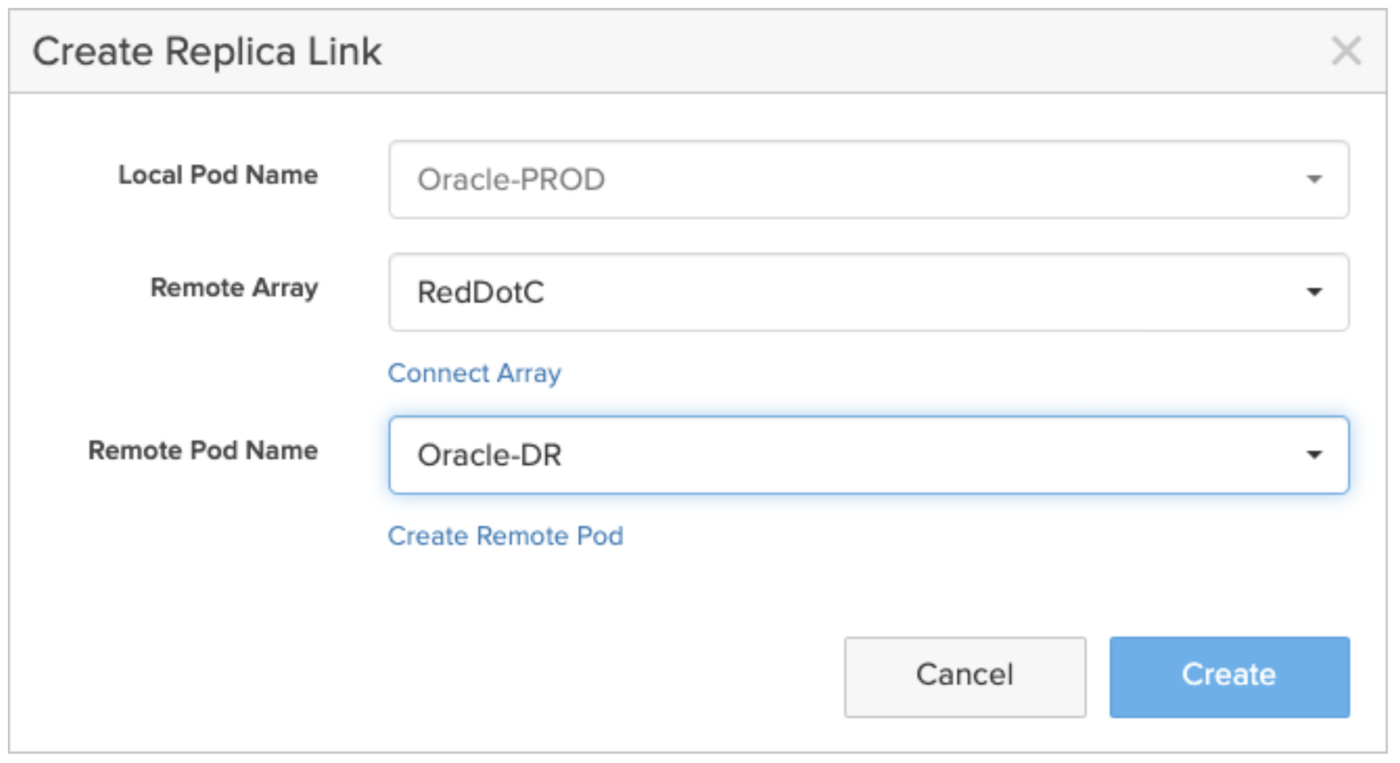
purepod replica-link create --remote-pod Oracle-DR --remote RedDotC Oracle-PROD
We now see the Pod Replica Link with an initial status of “baselining.” This is the initial copy or seed of the database volume data from the PROD to DR pods.

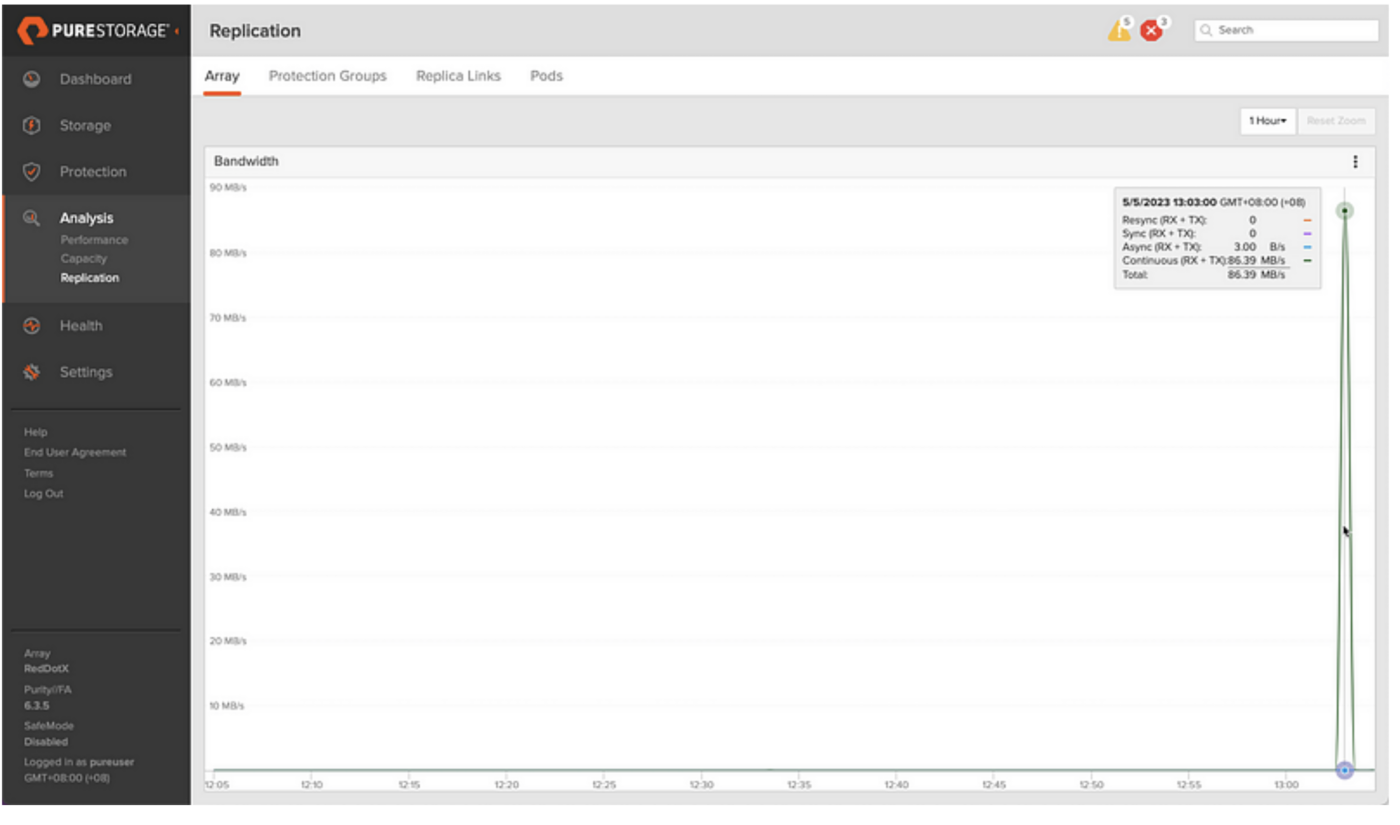
The replication traffic can be monitored on the Analysis > Replication tab, and it’s worth noting that FlashArray systems preserve data reduction across the wire. So if I have a 4TB database that’s achieving 4:1 data reduction, through FlashArray’s in-built compression and deduplication algorithms, I’ll only need to transfer 1TB of data across the wire for the initial baseline.
Once complete, our database volumes have replicated to the DR array and are safe in the event of any failure/outage at the PROD site.

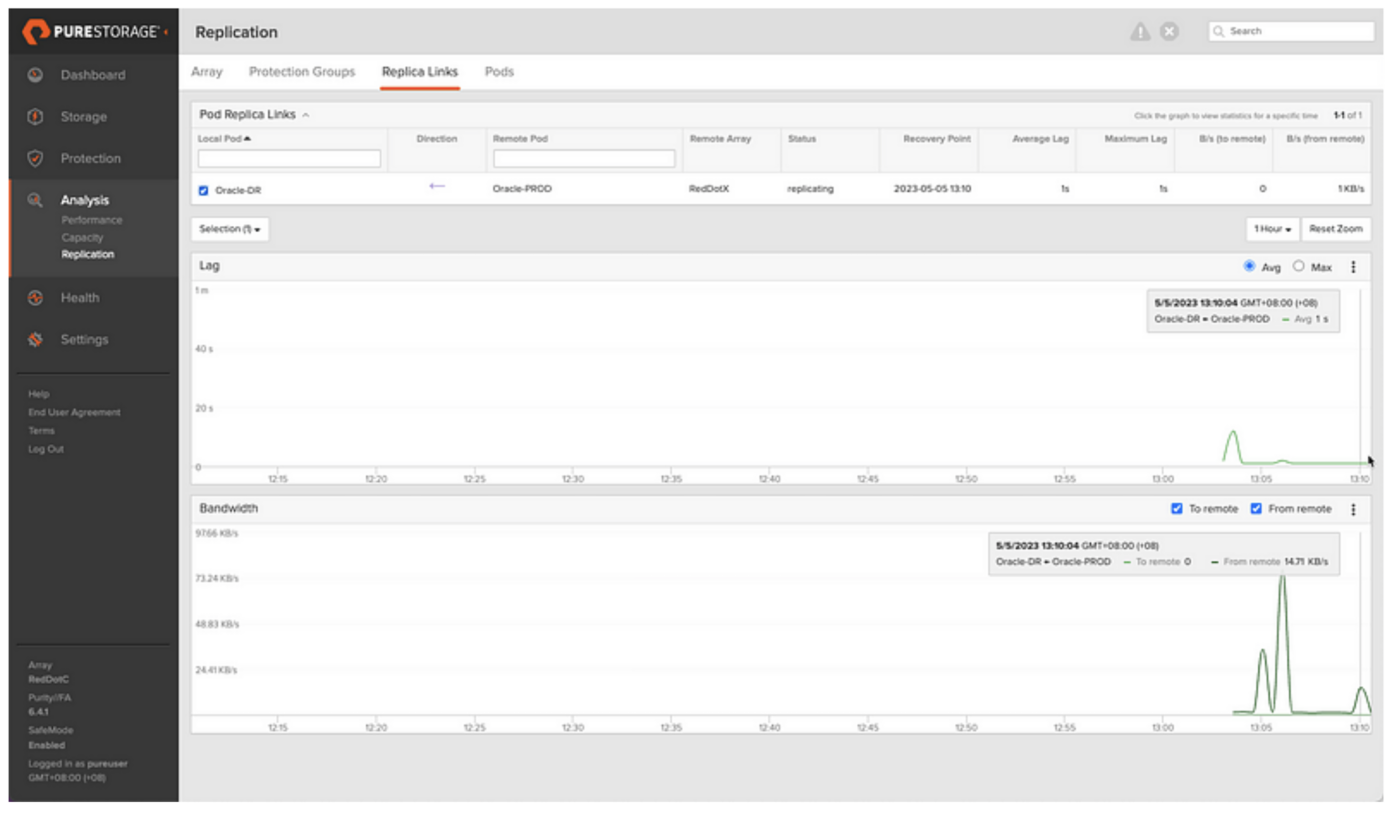
Replication of all changes to the production database will be transmitted in a near-sync fashion. We can monitor any lag from the Analysis > Replication > Replica Links tab and see that after the initial seed, the lag is around 1s where it should remain unless there is an extremely heavy write workload on the source database or some network issue between the sites.
So now our database volumes are protected and replicated to the DR site. Part 2 will show how these can be used to build and open the database at the DR site. Part 3 will show how to use this for non-disruptive DR testing (yes, that does mean the end of those 8am starts to perform DR drills at the weekend). Part 4 will show how to use this for real DR failover scenarios and subsequent failbacks.
![]()