Summary
A new feature is now available for Pure Cloud Block Store on Azure that enables you to automate capacity upgrades using Azure Functions and PowerShell.


We’re excited to announce a new feature for Pure Cloud Block Store™ on Azure: automatic user-driven capacity upgrades. This innovation builds upon the capability to self-upgrade capacity on Pure Cloud Block Store on Azure for users who are on Purity version 6.6.2 or later and can scale up their storage capacity without the need to contact Pure Support. This blog post aims to go deeper into this innovation by showcasing how to automate the capacity expansion process using Azure Functions and PowerShell. To provide some background: In a previous post, we discussed our newly generally available host lifecycle management integration between Azure VMware Solution (AVS) and Pure Cloud Block Store.
This integration enables automatic updates to AVS ESXi host membership lifecycle management through the power of Azure Functions.
Automating Capacity Upgrades for Pure Cloud Block Store
Building on this foundation, we’ve expanded the capabilities of Azure Functions to automate user-driven capacity upgrades for Pure Cloud Block Store. Users can now set a capacity threshold on a per-array basis that, once reached, automatically initiates a storage expansion.
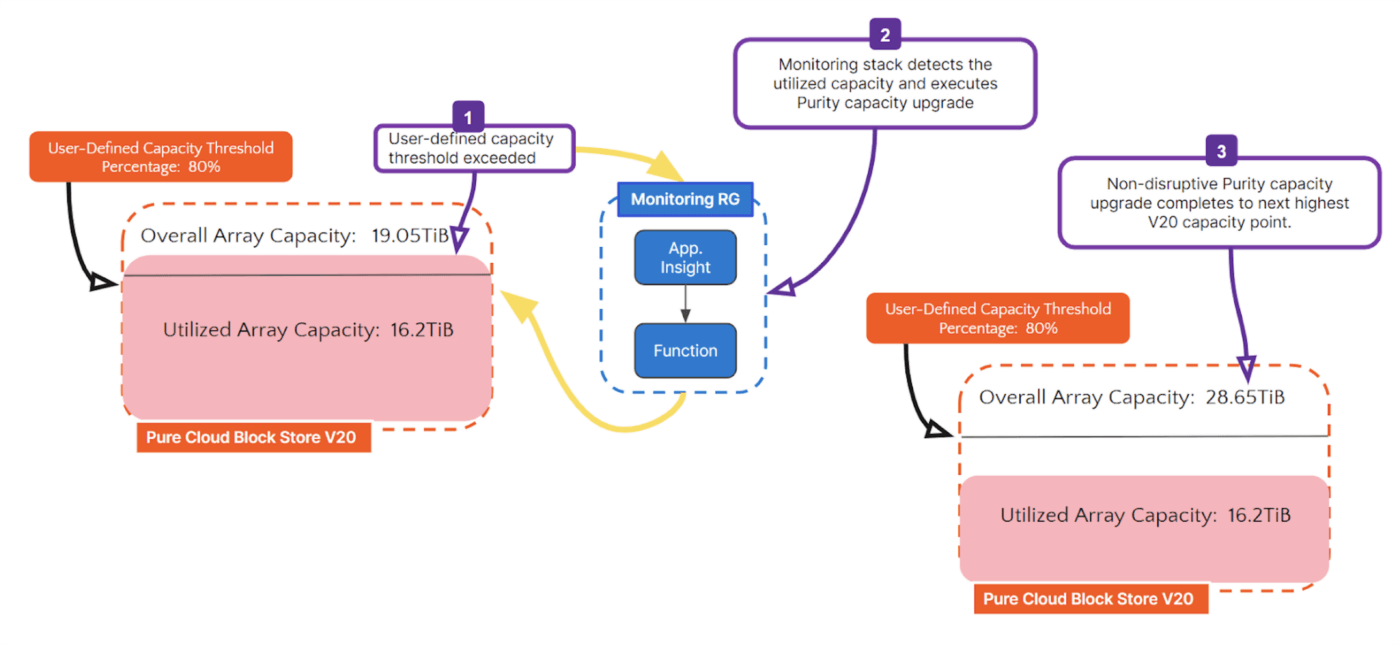
Figure 1: Graphical representation of automatic Pure Cloud Block Store capacity expansion.
This enhancement is useful as it ensures your array autonomously expands its storage capacity before reaching full utilization, thereby mitigating the risk associated with maxing out available space. It’s important to note that opting in is required for this feature. This requirement is in place because adding capacity to a Pure Cloud Block Store instance will increase your monthly spend on Azure infrastructure. We understand that some customers prefer to have direct control over when and how their spending increases.
New Capacity Monitoring Capabilities with PowerShell Functions
The PowerShell functions for creating and managing capacity monitoring infrastructure are now available and included in version 1.1.322 of the PureStorage.CBS.AVS module. In this article, we’ll discuss the following functions:
Deploy-PCBSCapacityMonitorAdd-PCBSCapacityMonitorArrayGet-PCBSCapacityMonitorRemove-PCBSCapacityMonitorArrayRemove-PCBSCapacityMonitor
The Deploy-PCBSCapacityMonitor function is essential for establishing a new Azure monitoring resource group or augmenting an existing host lifecycle monitoring resource group with capacity monitoring capabilities. For the purposes of this post, we will focus on creating a brand-new resource group.
The required parameters for setting up a new resource group with the Deploy-PCBSCapacityMonitor command include:
-MonitorResourceGroup myMonitorGroup: Specifies the name of the resource group where the capacity monitoring system will be deployed. This can either be a newly created resource group or an existing AVS host monitor resource group.-MonitorResourceGroupRegion myRegion: Defines the region where the host monitoring components will be deployed. It’s recommended to use the same region as your Pure Cloud Block Store deployment.-AVSCloudName myAVSCloud: Identifies the AVS SDDC instance to associate with. Note: The requirement for an AVS SDDC association will be removed in an upcoming release, allowing for Pure Cloud Block Store expansion without needing an Azure VMware Solution association.-AVSResourceGroup myAVSCloudResourceGroup: The resource group that contains your AVS deployment.-VNetName myVNet: The name of the Azure virtual network used by (or peered to) your Pure Cloud Block Store.-VNetResourceGroup myVNetRG: The Azure resource group containing the virtual network mentioned above.-VNetSubnetAddress 192.168.1.0/24: The CIDR block for the capacity monitoring function for network connectivity. This can be the same subnet used by an existing AVS host monitoring setup, a new unused address block within the Azure virtual network, or an existing subnet not currently used by any Azure services.
Optional parameters include:
-VNetSubnetName myVNetSubnetName: Allows you to specify a name for the Azure virtual network subnet to be used by the capacity monitoring infrastructure. If omitted, a subnet name will be generated automatically.-DefaultUtilizationThreshold 80: Sets the default capacity utilization threshold that triggers an expansion. If this parameter is not included, the default threshold is 80%.-MonitorIntervalInMinute 30: Specifies how frequently the monitoring system checks array utilization, with the default interval being 30 minutes.
After successful execution, the capacity resource group will be available in your subscription, comprising the components outlined above.
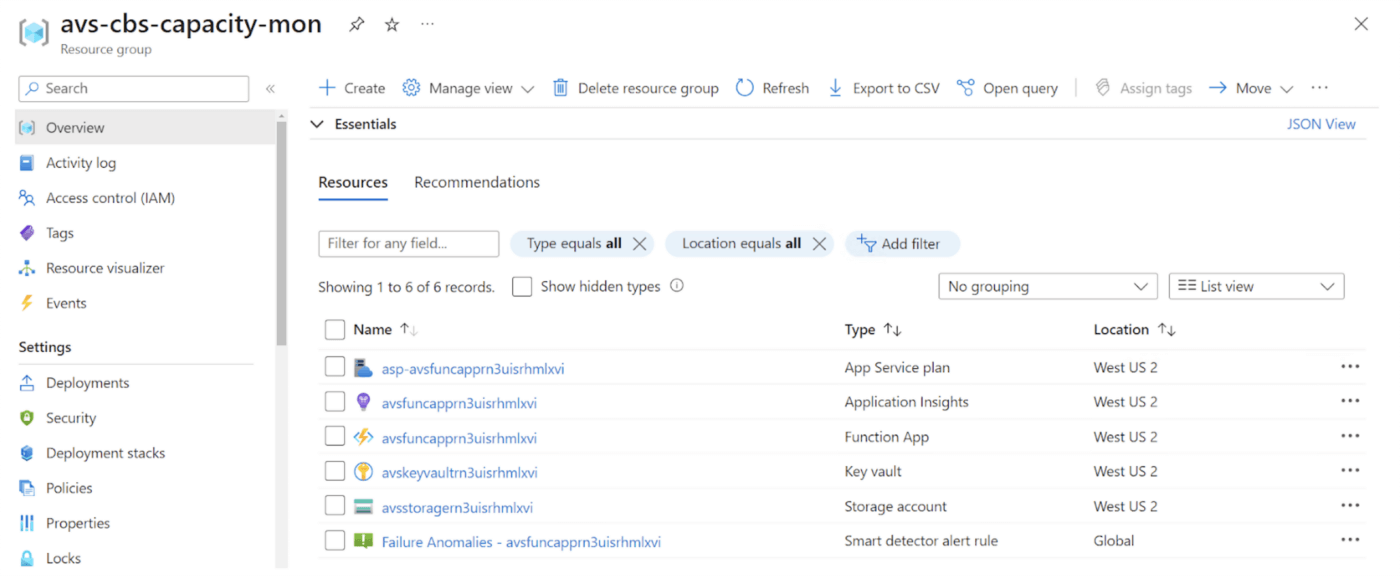
Figure 2: Resource group components for capacity monitoring.
The components of the capacity monitoring setup are identical to those in the host lifecycle management resource group. This similarity allows for the integration of both automation functions within the same resource group (RG). For more details on these components and their functionalities, check out the documentation.
After establishing the capacity monitoring system, the next step involves adding a storage array to the monitoring setup. To accomplish this, the command Add-PCBSCapacityMonitorArray should be executed. This command requires the following parameters:
-MonitorResourceGroup myMonitorGroup: Specifies the capacity monitor resource group that was either created or specified in the previous step.-PureCloudBlockStoreEndpoint myArray: Identifies the management IP address of the Pure Cloud Block Store instance.-PureCloudBlockStoreCredential (Get-Credential): This will prompt for the Pure Cloud Block Store array’s username and password, ensuring secure access.
Once the Pure Cloud Block Store array is successfully integrated, its status and adherence to the desired capacity threshold can be verified using the command: Get-PCBSCapacityMonitor -MonitorResourceGroup myMonitorGroup. This verification step ensures that the array is monitored correctly and will trigger an expansion process once it reaches the specified capacity threshold (for example, set at 60%).
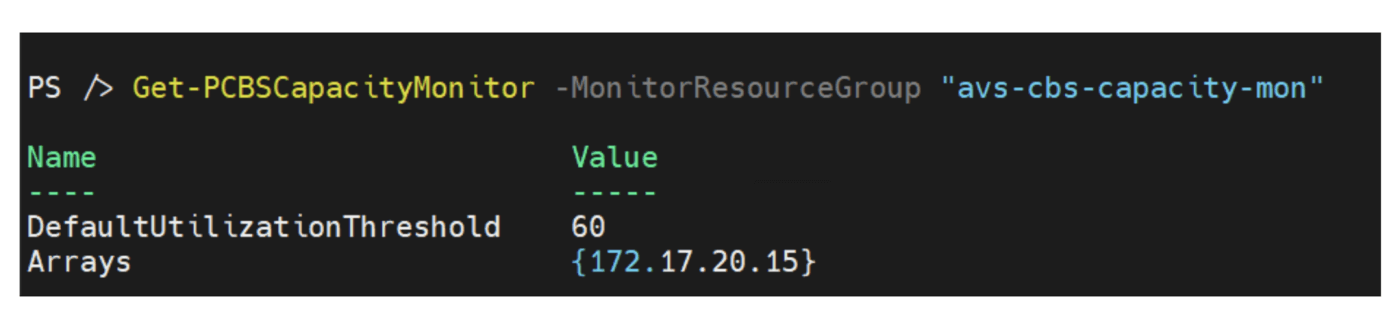
Figure 3: PowerShell output showing an array being monitored for capacity expansion with the threshold set to 60%.
The additional commands, Remove-PCBSCapacityMonitorArray and Remove-PCBSCapacityMonitor, serve to reverse the setup process. Specifically, Remove-PCBSCapacityMonitorArray removes a Pure Cloud Block Store instance from the capacity monitoring system, while Remove-PCBSCapacityMonitor dismantles the resource group with all of its components dedicated to capacity monitoring.
To further assist you, we’ve created a two-part technical demo video series. These videos show the end-to-end setup process, from adding a Pure Cloud Block Store array to the monitoring system to demonstrating the capacity upgrade process when the array reaches the set capacity threshold. These instructional videos are an excellent resource for those looking to familiarize themselves with the setup and operation of the capacity monitoring system.
Automatic Pure Cloud Block Store Capacity Expansion on Azure: Part 1
Automatic Pure Cloud Block Store Capacity Expansion on Azure: Part 2
![]()