

Lightweight, stand-alone, and secure, containers provide a reliable runtime environment that will work consistently from host to host. Looking to get started building and deploying your own containerized apps? In this article, we’ll explore how to create a Docker image so that you can build and deploy your own containerized apps.
What Is Docker?
Docker is a platform that allows you to build, test, and deploy containerized applications. It provides operating-system-level virtualization by packaging applications and their dependencies into lightweight, portable software bundles called containers. Let’s take a closer look at some of the features Docker has to offer.
What Is a Docker Image?
Docker images are read-only templates Docker can use to create and run containers. The image contains the installations, application code, and dependencies needed to configure a container environment.
What Is a Dockerfile?
A Dockerfile is a text document that contains the build instructions needed to build a container image. It contains all the commands you would manually input into your terminal to create and run a container in Docker. The Dockerfile can be used to automate this process. One advantage of storing a Dockerfile as opposed to the image itself is that an automated build can ensure you always have the latest versions available.
What Is Docker Hub?
Docker Hub is a repository of container images from the Docker team and the larger community of software developers, vendors, and open source projects. You can push and pull container images, automate builds, and integrate with other code repositories like GitHub and Bitbucket. Docker Hub is the place to go to retrieve Docker images you can use as a base to start your own projects.
Creating a Docker Image with a Dockerfile
While you could input the commands of the previous section to create your own Docker image from scratch, it’s much easier in practice to automate this process for future runs by transcribing these commands into step-by-step instructions within a Dockerfile. Here’s how:
Install Docker
The first step is to get Docker set up on your machine. Navigate to the Docker documentation and install Docker Engine for your preferred operating system. For the purposes of this tutorial, we’ll be using Docker Desktop on Windows.
Create a Dockerfile
Creating a Dockerfile is as simple as creating a text file in your text editor with all the commands you would call in the command line to assemble an image. You can name this file whatever you want, but we’ll be using the name “Dockerfile” for simplicity. You can use the syntax from the Docker documentation to specify these build instructions.
Create a Dockerfile in the ‘/app’ directory of your project folder. In order for this tutorial to work, we’ll also create a simple Flask app in an ‘app.py’ file within the same directory:
from flask import Flaskapp = Flask(__name__)@app.route(‘/’)def my_app():return ‘This is a Flask App’if __name__ == ‘__main__’:app.run(host=’0.0.0.0′, port=5000) |
Example of a Dockerfile
# Creating a Dockerfile for Python 3# Use an existing base image from Docker HubFROM ubuntu:latest# Set the working directory inside the containerWORKDIR /app# Copy the application files from the host to the containerCOPY . .# Install any required dependenciesRUN apt-get update && apt-get install -y python3 python3-pip# Install Flask using pipRUN pip3 install Flask# Expose a port on the containerEXPOSE 5000# Specify the command to run when the container startsCMD [“python3”, “app.py”,”–host”, “0.0.0.0”] |
In this example, we start with an Ubuntu base image pulled from Docker Hub. We set the working directory to ‘/app’ inside the container. Then, we copy the application files from the host machine to the container’s ‘/app’ directory.
Next, we use the ‘RUN’ instruction to update the package manager and install Python 3 and Flask inside the container. This ensures that the necessary dependencies are installed.
Finally, we use the ‘CMD’ instruction to specify the command that should be executed when the container starts. In this case, it runs the ‘app.py’ Python script using the Python 3 interpreter.
This Dockerfile can be used to build a Docker image, which is a template for creating containers. When the image is built and a container is created from it, the container will have the specified dependencies and will run the specified command when started.
Building a Docker image
With Dockerfile in hand, you can build the Docker image using the ‘docker build’ command while providing a name for the image with the ‘t’ flag (e.g., ‘myapp:latest’).
In the terminal type:
docker build -t myapp:latest . |
Don’t forget the ‘.’ at the end. This specifies the build context, in this case, the directory where the Dockerfile is located.
Congratulations you now have a Docker image!
You can verify that an image has been created by clicking the Images tab in Docker Desktop:
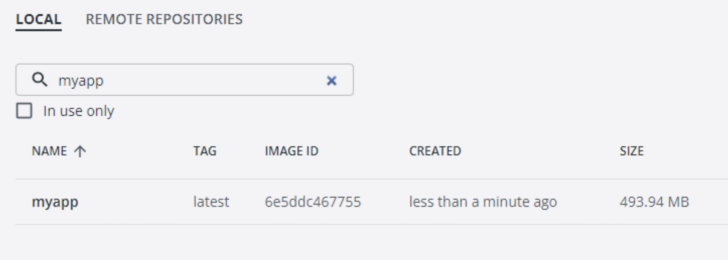
Each image can be identified by a name, a tag, and an image ID.
Note that you may also type “docker image ls” or “docker images” (with no arguments) into the terminal to list all images.
Creating a Container from a Docker Image
Now that you have a Docker image, it’s time to create and run a container off of that image.
Type the following command into the terminal:
docker run -p 5000:5000 –name mycontainer myapp:latest |
The ‘–name’ tag tells Docker to create and run a container named ‘mycontainer’ based off of the image ‘myapp:latest.’ In our example, you now have an Ubuntu environment running the ‘app.py’ file specified within the Dockerfile and Python 3. You can view your newly created active container in Docker Desktop:

If you navigate to https://localhost:5000 in the browser, it will allow you to see your app printing the text “This is a Flask App.”
Creating a Docker Image from a Running Container
It’s also possible to modify the internal state of a running container and save it as a new image. A common developer workflow is to tweak a running container until it works, and then save the result as an image for future deployments. This ability to build, test, and deploy services on the fly is a big reason behind the rise in popularity of containers.
You can modify a running container with the ‘docker cp’ command like so:
docker cp app.py myapp:latest |
This command copies a new app.py file to the active directory of our running container. One could feasibly modify the ‘app.py’ file locally and push the changes to the running container to see how they affect the app. Once you’re satisfied with the changes, you can commit them to a new image like so:
docker commit -c <myapp:latest> -m “New image from running container” <myapp:final> |
Conclusion
In this article, we walked you through the process of creating and running a container from a Docker image. While this simple tutorial is fine for individual containers, things can get tricky when you need to manage more than one container at the same time. For enterprise microservices apps, container orchestration tools such as Kubernetes are required to build, deploy, and orchestrate thousands of containers or more.
Leadership Challenges with AI in the Workplace: How to Combat Bias in AI
![]()