

In our previous blog about Azure VMware Solution (AVS) and Pure Cloud Block Store™, we provided an overview of a new management paradigm introduced from this integration: Azure Run Command. If you’re unfamiliar with what Run Command is, we’d encourage you to review that post in order to get a feel for what it is and how you can get it implemented. Building from that introduction, the purpose of this blog post will be to focus on the initialization of your AVS instance so that you can start provisioning and managing storage between it and Pure Cloud Block Store.
Before initializing your AVS instance, a few prerequisites are needed: AVS and Pure Cloud Block Store instances have been deployed, those instances are connected to each other, and you’ve got the VMware Cloud Manager OVA deployed inside of AVS with a PowerShell prompt available. The Implementation Guide on the Pure Storage support site provides step-by-step documentation on how to accomplish all of these steps.
Build-PCBSCluster Command Overview
The first step leading up to adding Pure Cloud Block Store storage to AVS is to initialize your target AVS cluster against the Pure Cloud Block Store instance that you want to leverage. This is accomplished by running an integrated PowerShell command called Build-PCBSCluster. This command executes a few important tasks:
- Initializes and enables the software iSCSI adapter on each ESXi host within the designated AVS cluster.
- Applies Pure Storage iSCSI best practices to the AVS ESXi hosts.
- Creates a host object on the designated Pure Cloud Block Store instance for each AVS host in the cluster, sets the ESXi host personality, and adds the AVS ESXi host iSCSI IQN to the host object.
- Creates a host group on Pure Cloud Block Store that is composed of the AVS ESXi hosts in the specified cluster.
It’s important to note that this command needs to be run on a per-AVS cluster basis, as you might only want to use Pure Cloud Block Store on a subset of your AVS clusters. For example, if you have an AVS instance that has three separate clusters running inside of it, you would need to run this command three times—once against each unique cluster. We also support utilizing this command against multiple Pure Cloud Block Store arrays and that can be done by updating the Pure Cloud Block Store management IP address specified and re-running the script against the same cluster to add the additional Pure Cloud Block Store array to it.
Build-PCBSCluster Command Example
There are two items that need to be confirmed and set prior to running this command. The first is to confirm that you’re actively using the Azure subscription that contains the AVS instance that you want to use with Pure Cloud Block Store. There are two PowerShell commands that you can use here: one to find out what context you’re using and another to switch to the context you need (if necessary).
To find your current context, run the following command from your PowerShell prompt:
|
1 |
PS Get-AzContext |

Figure 1: Sample output from running the Get-AzContext command.
If the returned value is a different subscription than what you want, run the following command to switch to the subscription ID that AVS is using. You can find the Azure subscription ID in the overview section of your AVS instance within the Azure portal:
|
1 |
PS Set-AzContext -Subscription "81cefe76-1111-0000-2222-e900f1aepstg" |

Figure 2: Sample output from changing Azure subscriptions.
Once you’ve got the right Azure subscription ID context set, the next step is to provide the management endpoint for the Pure Cloud Block Store instance you want to use with your AVS cluster. The Pure Cloud Block Store management endpoint is how we’re able to connect and configure the array via the Pure Storage PowerShell SDK. To add the Pure Cloud Block Store instance, enter the following command:
|
1 |
PS $CBSConnection = Connect-Pfa2Array -Endpoint "172.17.20.25" -Credential (Get-Credential) -IgnoreCertificateError |

Figure 3: Sample output adding a Pure Cloud Block Store connection to your PowerShell session.
The only step left for enablement is to run the Build-PCBSCluster command itself. The command syntax is straightforward and only requires a couple of parameters:
|
1 |
PS Build-PCBSCluster -ClusterName "myCluster" -AVSCloudName "myAVSCloudName" -AVSResourceGroup "myAVSResourceGroup" |

Figure 4: Build-PCBSCluster example command with parameters specified below.
Breaking down the above command:
- The -Cluster parameter within an AVS context will always be something like “Cluster-1” or “Cluster-2” as AVS does not allow custom names for clusters.
- The –AVSCloudName refers to the name you gave your AVS instance when it was created.
- Lastly, the -AVSResourceGroup parameter corresponds to the Azure Resource Group in which your AVS instance resides.
Upon execution, you should see the command iterate through the AVS hosts in your cluster. Depending on the size of the cluster, this can take a few minutes. Once the script completes, a quick and easy way to determine if the cluster has been enabled successfully is to log in to the Pure Cloud Block Store GUI, click on the host group with the corresponding cluster name, and confirm that the hosts shown match the ESXi hosts names in your AVS cluster.
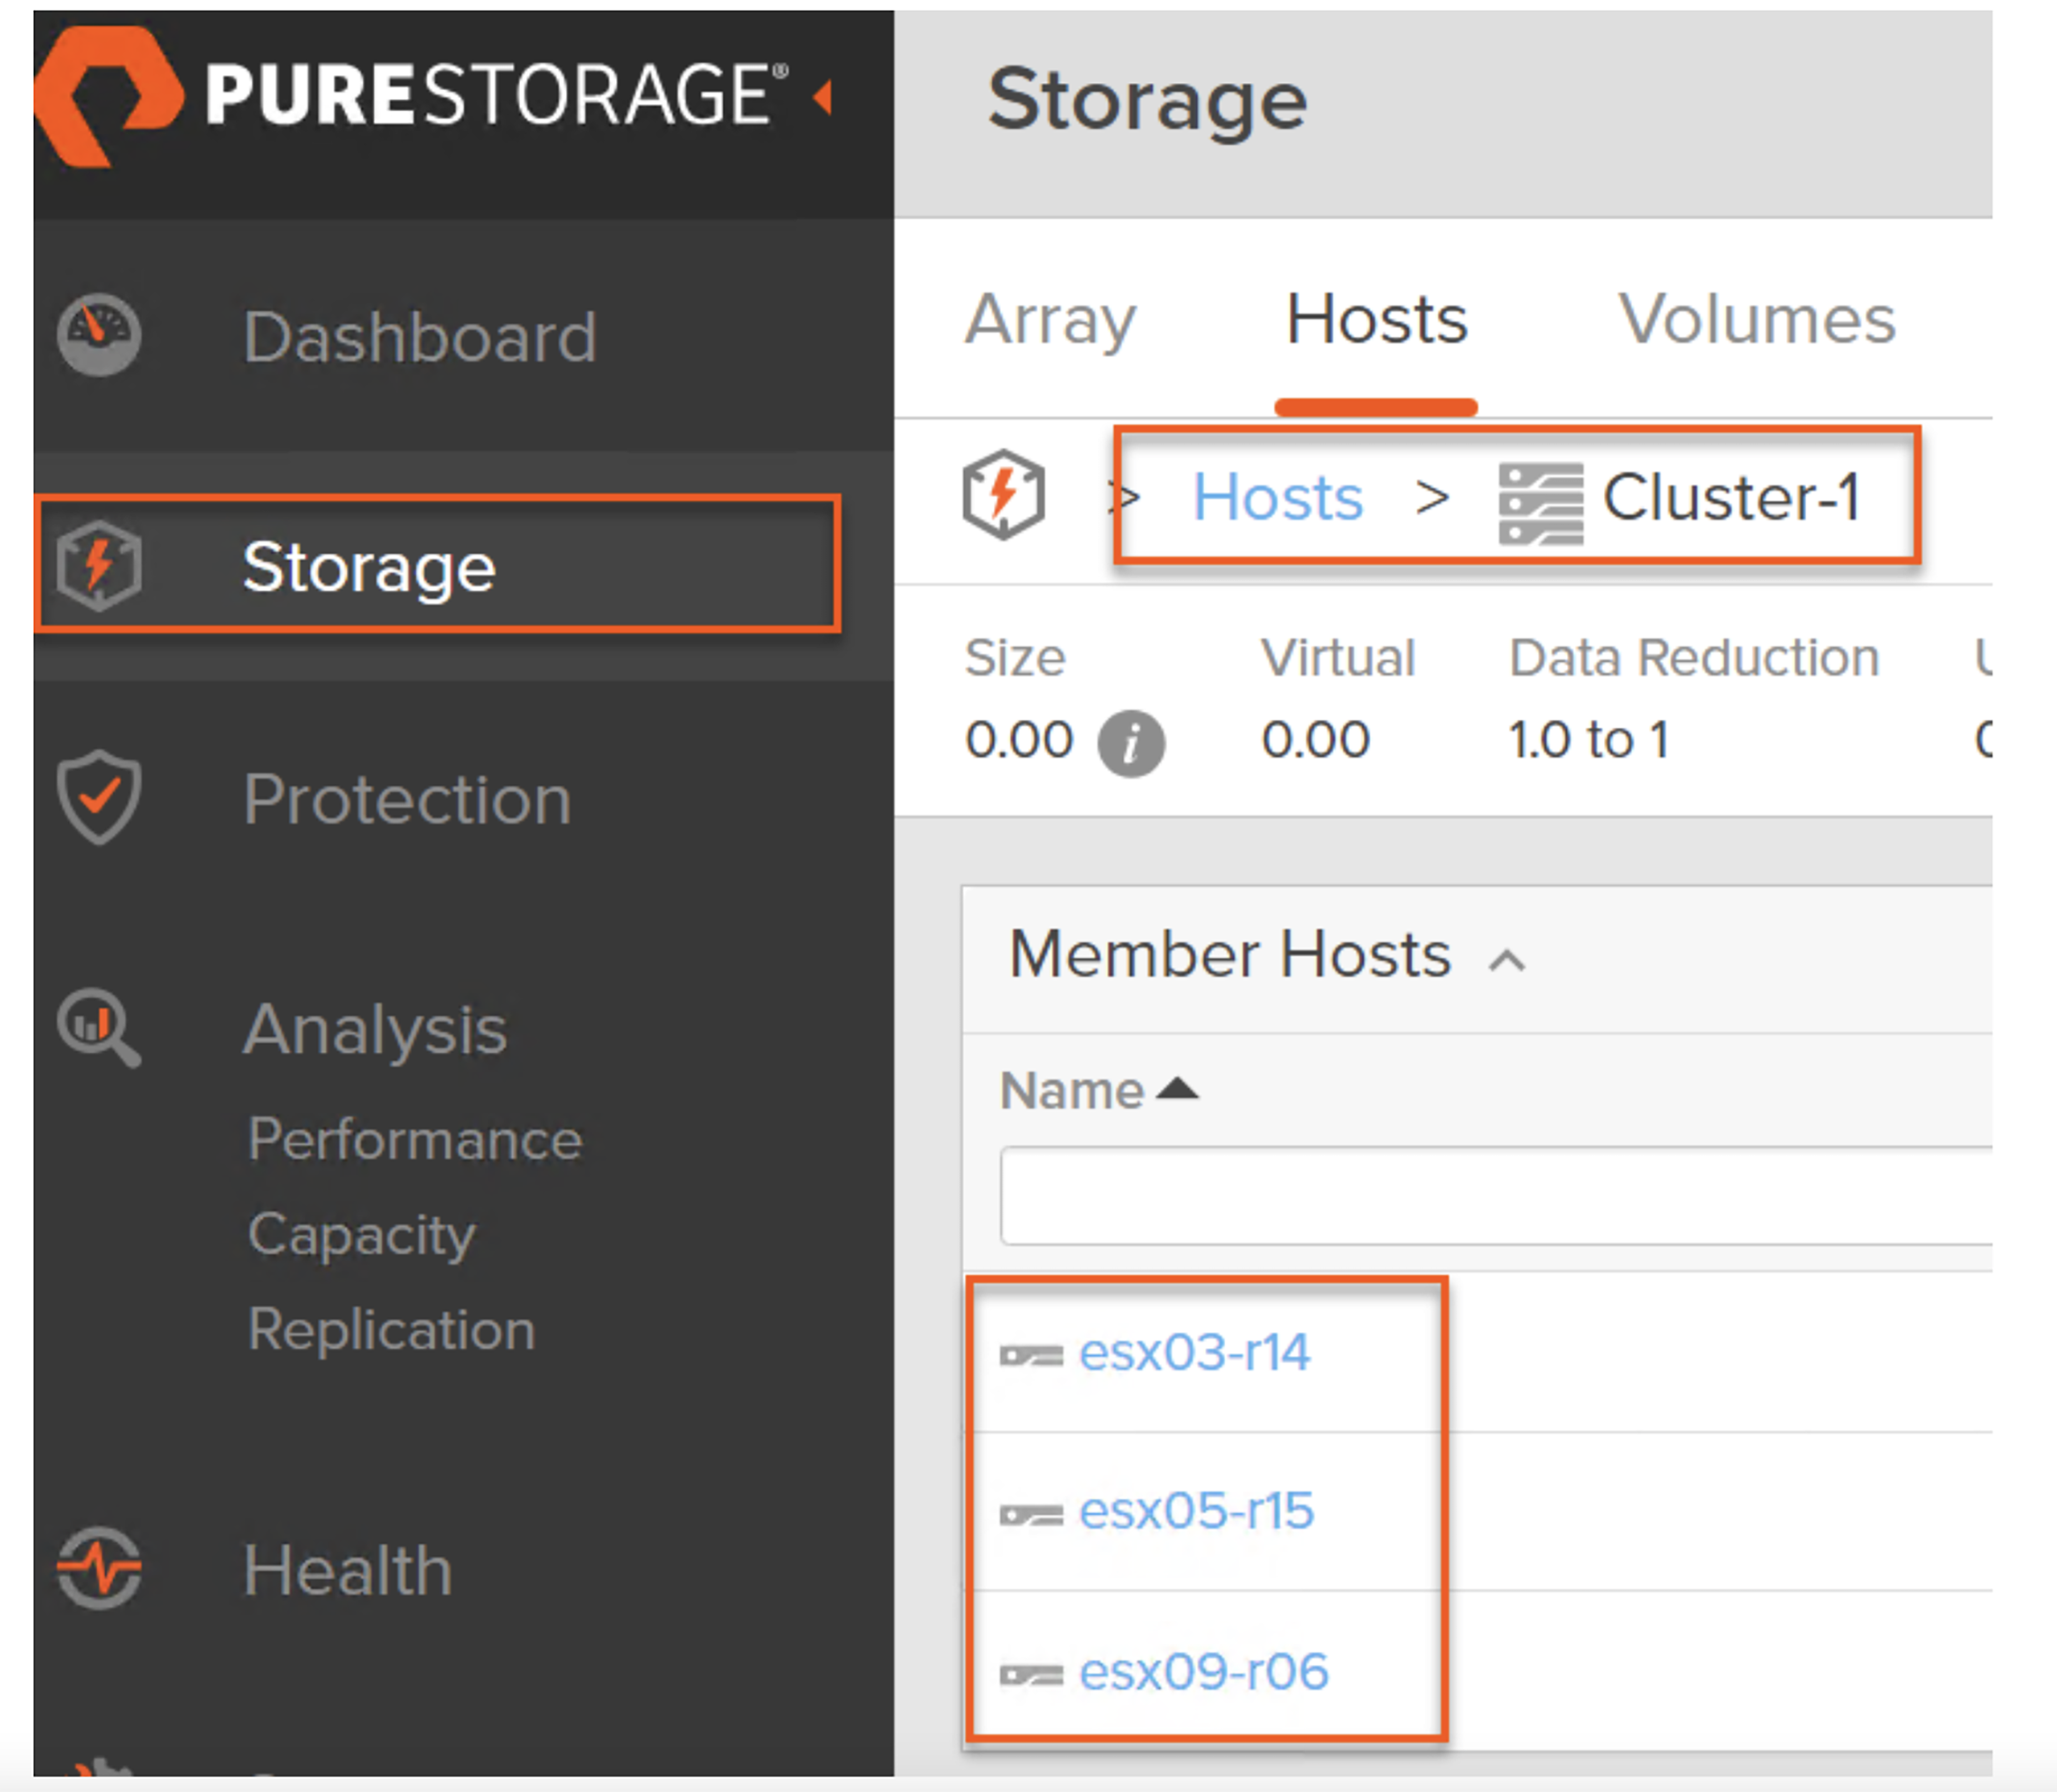
Figure 5: Pure Cloud Block Store GUI showing the correct AVS ESXi host membership inside of a host group after running the Build-PCBSCluster command.
Alternatively, you can go to the vCenter GUI, select an ESXi host, go to Storage Adapters, and click on iSCSI Software Adapter to confirm that the adapter has been enabled and that the Pure Cloud Block Store iSCSI IP address appears in the dynamic targets list. You can also view the AVS ESXi host iSCSI IQN from this same window.
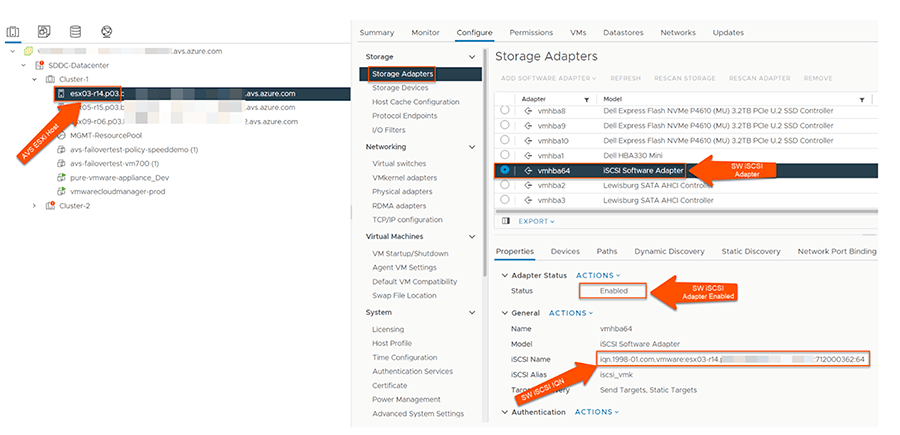
Figure 6: AVS vCenter GUI showing that an AVS ESXi host has an enabled software iSCSI adapter with an associated iSCSI IQN.
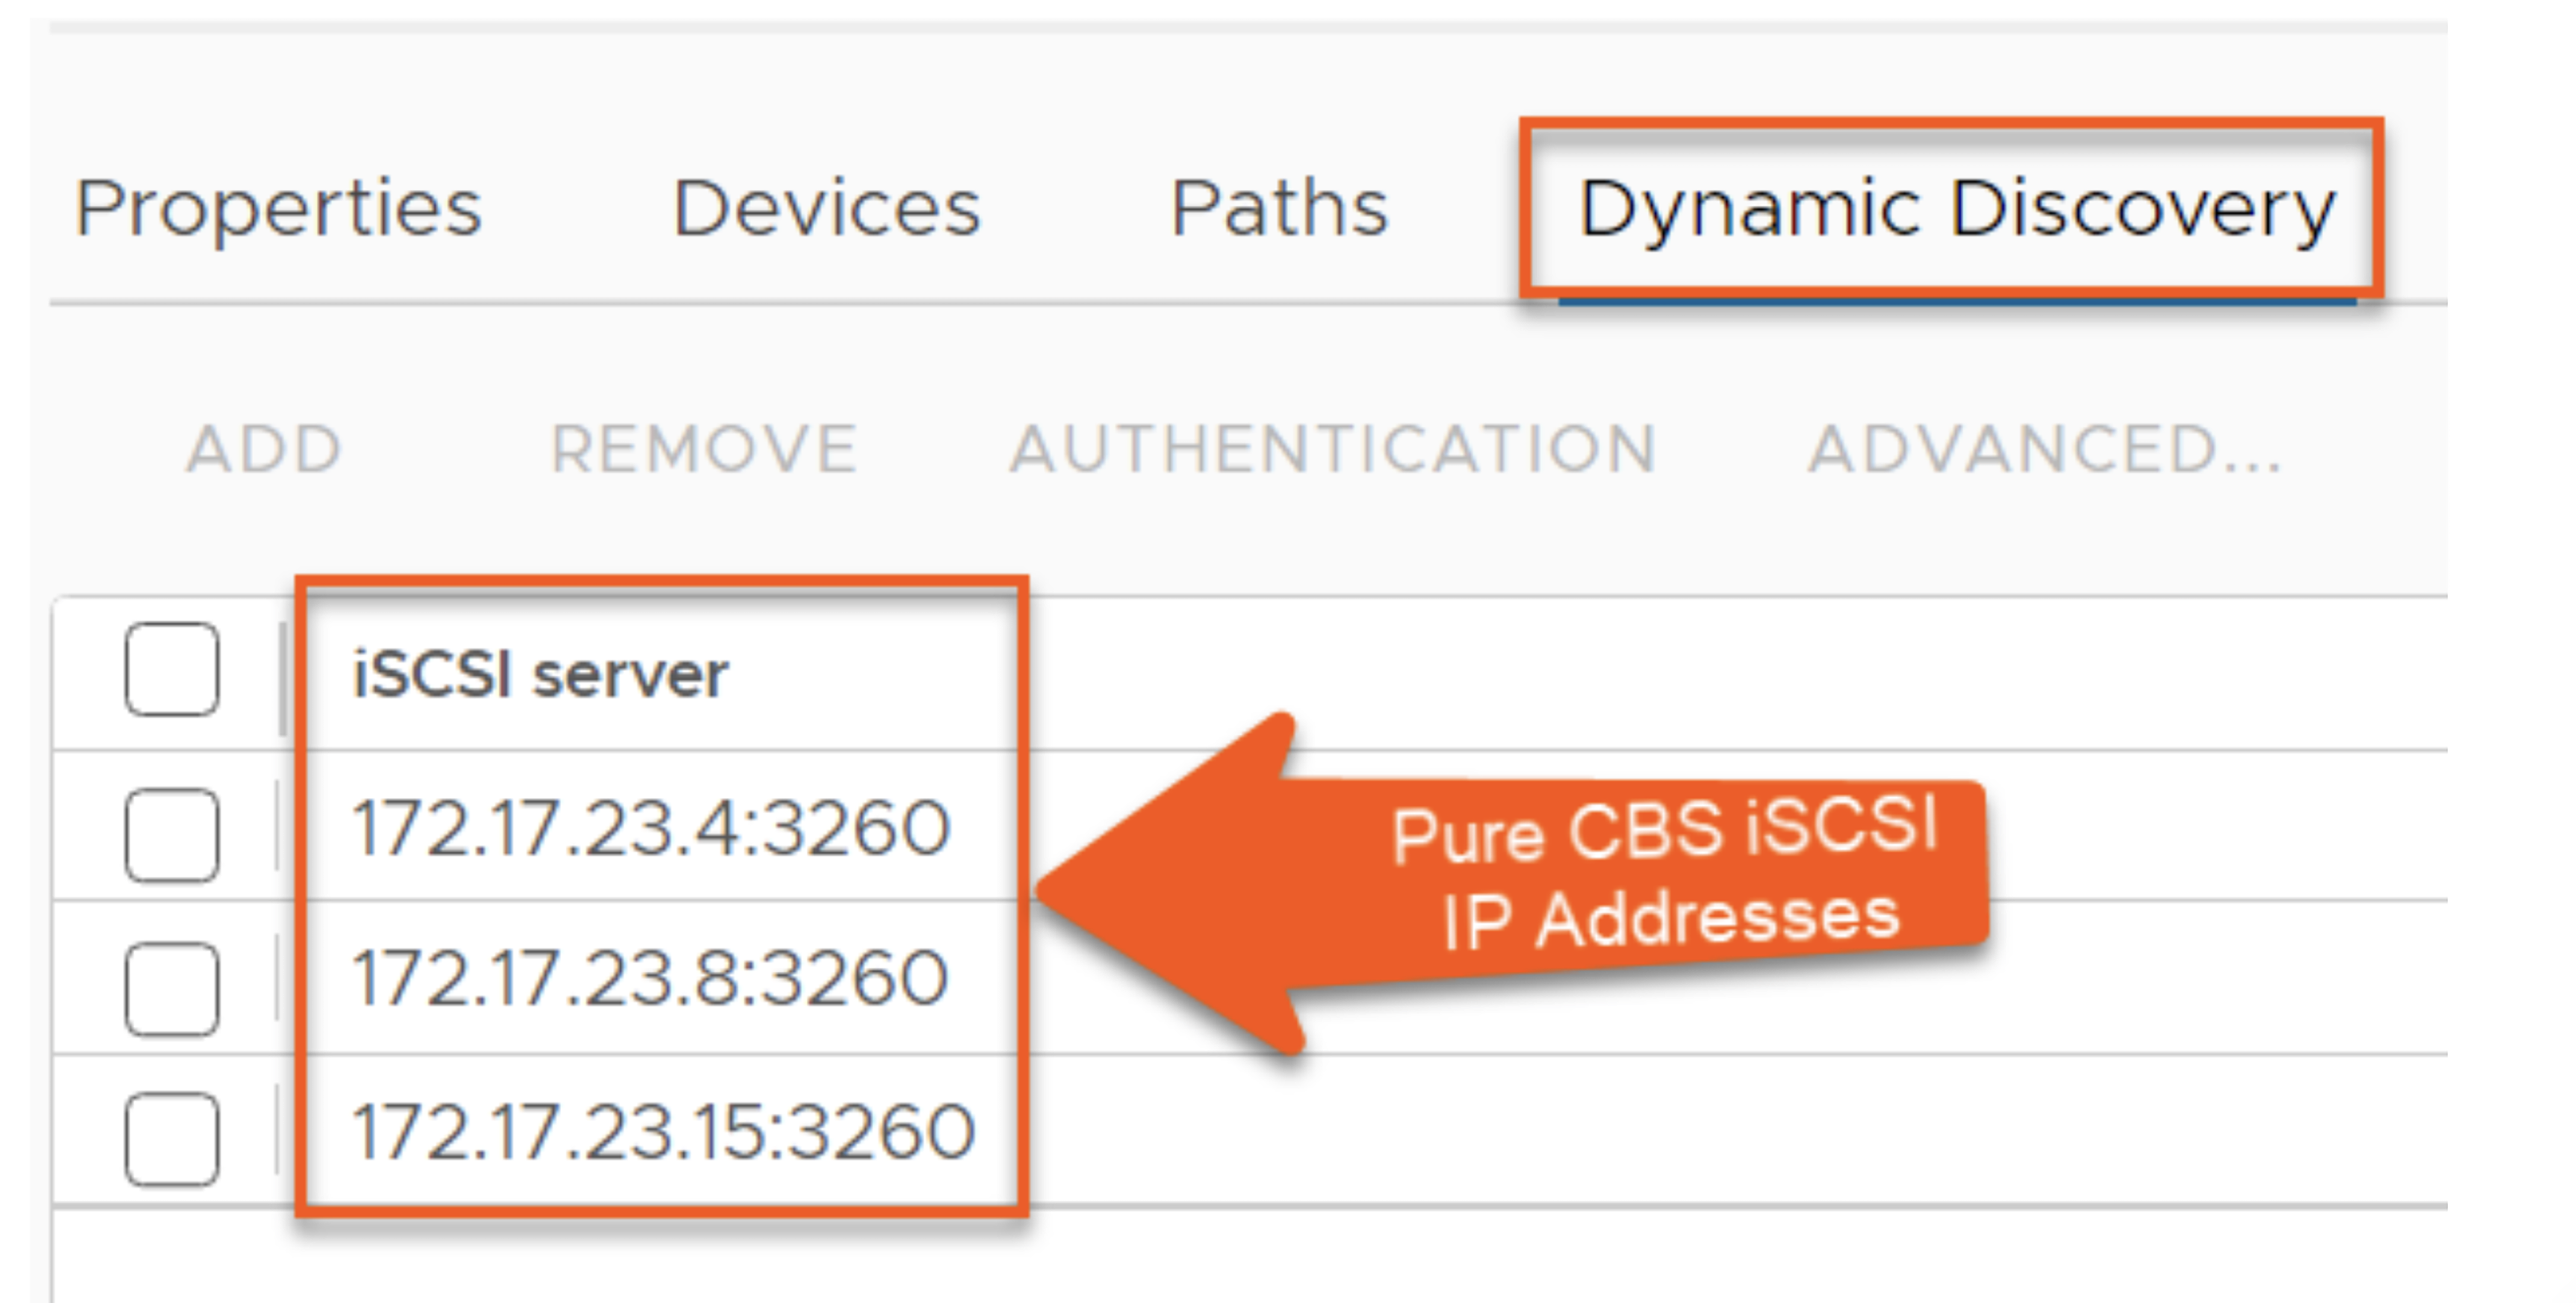
Figure 7: Clicking on Dynamic Discovery within the vCenter SW iSCSI adapter window shows that this particular AVS ESXi host is connected to three separate Pure Cloud Block Store arrays.
Now that we’ve got the cluster successfully configured, the next step will be to provision a new VMFS datastore or restore a replicated VMFS datastore snapshot to our AVS cluster. We’ll cover that in the next post in this series, but for a sneak peek, please feel free to check out this article that outlines how to use those additional PowerShell commands.
![]()