Summary
Docker is a tool used for containerization, while Terraform is for infrastructure management. This article offers a tutorial on how to build and deploy a Docker image using Terraform.


Containerization has revolutionized software development by enclosing applications with their dependencies into portable, self-contained units. This ensures consistent behavior across environments. Working alongside containerization is infrastructure as code (IaC), a powerful approach for managing infrastructure through code. IaC streamlines infrastructure provisioning and configuration, eliminating manual processes and enabling management directly from your coding environment.
Leading the charge in these techniques are Docker for containerization and Terraform and Ansible for infrastructure management. Docker simplifies the packaging of applications and their dependencies into portable, self-sufficient containers. These containers encapsulate everything an application needs to run, from code to libraries, ensuring consistency across different environments. Terraform and Ansible, on the other hand, treat infrastructure as code, allowing you to define your desired state using simple, declarative configuration files.
Another equally powerful modern technique of software developed alongside IaC using Terraform is Kubernetes, which orchestrates and manages Docker containers. But we won’t be covering that in this article.
In this tutorial, you’ll learn how to build and deploy a Docker image using Terraform.
Understanding Ansible and Terraform
Before we discuss deploying Docker images with Terraform, let’s distinguish between Ansible and Terraform.
Ansible, known for its agentless architecture and simplicity, focuses on configuration management and application deployment. It excels at:
- Automating repetitive tasks
- Orchestrating complex workflows
- Ensuring consistency across multiple servers
Terraform, on the other hand, specializes in infrastructure provisioning. It enables you to define and manage your infrastructure as code, abstracting away the complexities of interacting with and provisioning resources like servers and storage on various cloud providers.
It excels at:
- Effectively managing states
- Deploying on multiple environments
- Supporting different platforms
Preparing the Environment
Before deploying Docker images with Terraform, you’ll need to install the required tools on your local machine.
1. Installing Docker
-
- Windows: To install Docker on a Windows machine, visit the official installation guide for Windows. Ensure your computer complies with all the system requirements (including enabling hardware virtualization and WSL 2 or Hyper-V feature) and follow the guide to successfully install the software on your machine.
- MacOS: Whether you’re using a Mac with an Intel or Apple silicon chip, ensure you’re running one of the three most recent versions of MacOS, then follow the official Docker macOS installation guides.
- Linux: To install Docker on a Linux machine, ensure you’re running an x86_64 or amd64 version of Ubuntu, Debian, RHEL, or Fedora, then proceed to install Docker as explained in the official installation guide.
Once installed, verify Docker is functioning correctly by opening a terminal and running the following command:
$ docker --version |
A successful installation will display the Docker version information.
2. Installing Terraform
To install Terraform, navigate to the official Terraform installation page and install the software for your operating system using a package manager (macOS and Linux) or downloading the binary.
Once downloaded, extract the executable and add the path to your environment variable (Windows). Verify the installation is successful by running the following command in a CLI:
$ terraform -help |
This command should display a list of available Terraform commands, indicating a successful installation.
3. Creating the Project Directory
To maintain organization throughout the deployment process, create a dedicated directory for our project named docker-terraform.
Building a Docker Image
We’ll build a Docker image for a Python Flask application. Then, we’ll deploy it with Terraform.
4. Set Up the Flask Application
Create a source directory: Navigate to your project directory (docker-terraform) and create a subdirectory named src to store your application code:
$ cd docker-terraform$ mkdir src |
5. Create the Flask Application
Inside the src directory, create a file named app.py and add the following Python code to implement a basic “Hello, World!” application:
from flask import Flaskapp = Flask(__name__)@app.route(code>’/’)def hello_world(): return 'Hello, World!'if __name__ == '__main__': app.run(host='0.0.0.0', port=5000) |
6. Creating the Dockerfile
The Dockerfile acts as a blueprint for building your Docker image. It specifies the instructions Docker will follow to create the image layer by layer.
In the main project directory (docker-terraform), create a file named Dockerfile with the following content:
# Use the official Python base imageFROM python:3.11-slim# Set the working directory in the containerWORKDIR /app# Copy the dependencies file to the working directoryCOPY requirements.txt .# Install Flask and other dependenciesRUN pip install --no-cache-dir -r requirements.txt# Copy the content of the local src directory to the working directoryCOPY src/ .# Specify the command to run on container startCMD ["python", "app.py"] |
This Dockerfile defines the following steps:
- Use the official Python 3.8 slim image as the base for our image.
- Set the working directory within the container to /app.
- Copy the requirements.txt file (explained below) to the working directory.
- Install Flask and other dependencies listed in requirements.txt.
- Copy the entire contents of the src directory (containing your application code) to the working directory.
- Specify the command to run when the container starts (python app.py), which launches your Flask application.
- Creating a requirements.txt File
Create a file named requirements.txt (in the same directory as the Dockerfile) and add the following line:
Flask==1.1.2 |
This file lists the Python dependencies your application requires. Here, it specifies Flask version 1.1.2. You can add additional dependencies as needed.
Building the Image
Once you have all the files in place, navigate to the directory containing the Dockerfile (docker-terraform) and execute the following command to build the Docker image:
$ docker build -t pure_image:latest . |
- docker build: This command instructs Docker to build an image.
- -t pure_image:latest: This tags the image with the name pure_image and the tag latest. You can customize these names as you wish.
- .: This specifies the current directory where the Dockerfile is located.
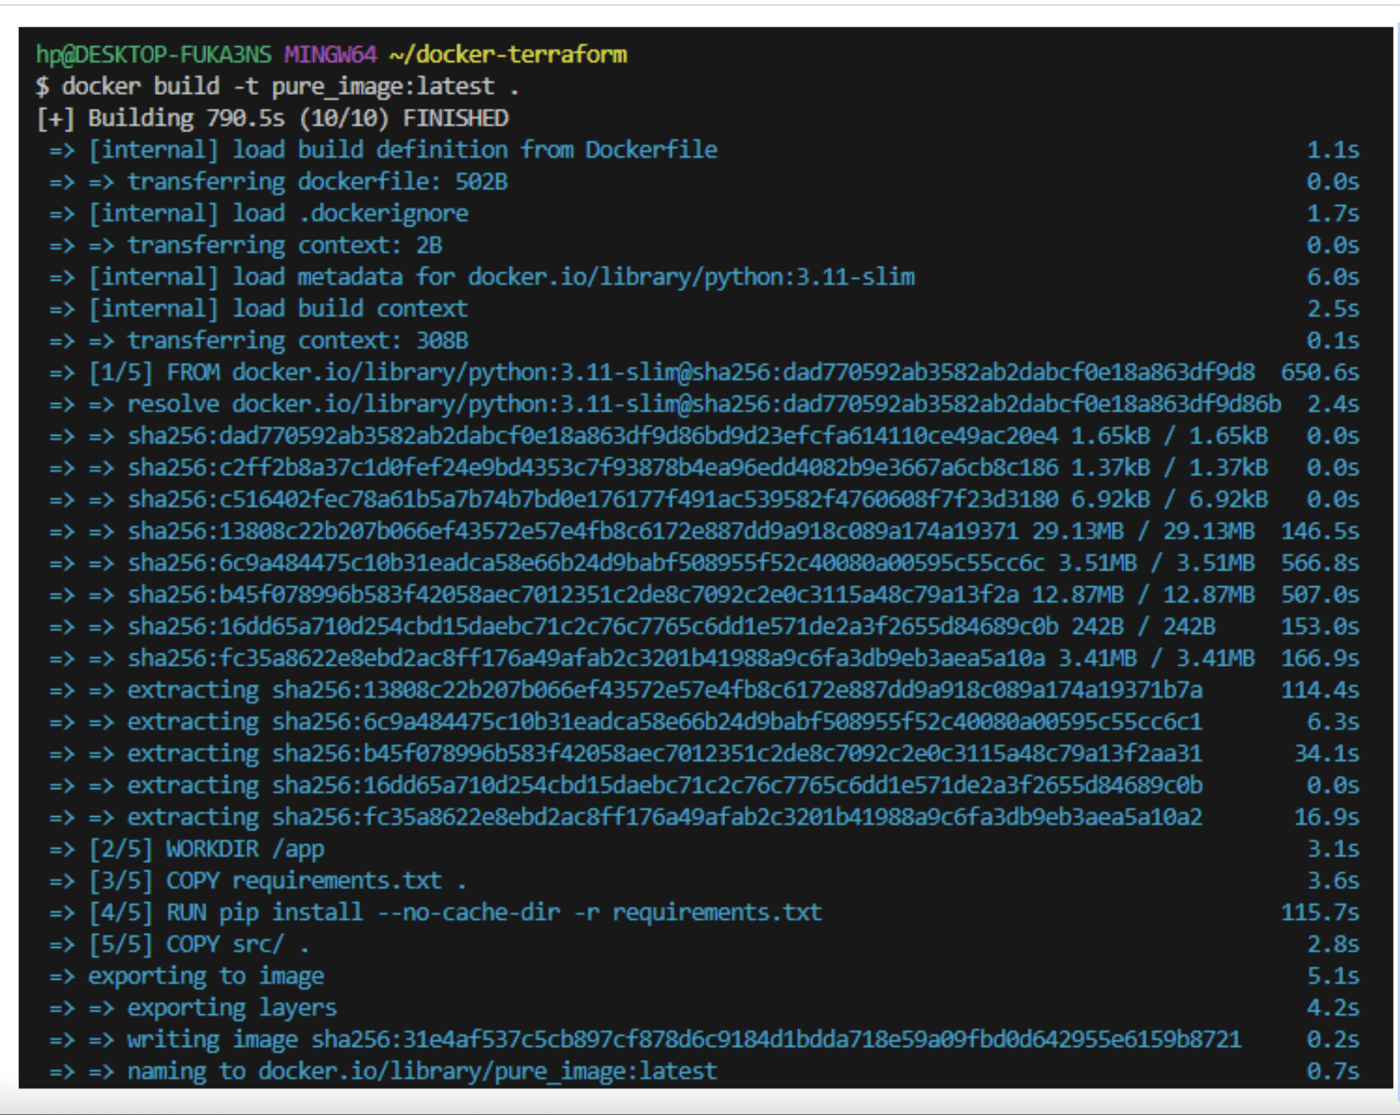
Verifying the Build
After the build process completes, use the following command to list all Docker images on your system and confirm that your newly created image is present:
$ docker images |
This command should display a list that includes your image named pure_image:latest.

Congratulations! You’ve successfully built a Docker image containing your Flask application. In the next steps, we’ll leverage Terraform to deploy this image.
Introduction to Terraform
Now that we’ve built Docker images, let’s explore Terraform, a leading tool for infrastructure as code (IaC). IaC replaces manual infrastructure configuration with code, allowing you to manage infrastructure like any other part of a software project. Using Terraform enables:
- Declarative configuration: Describe the desired infrastructure state, and Terraform handles the provisioning details.
- Wide provider support: Terraform integrates with various cloud providers (AWS, Azure, Google Cloud) and infrastructure platforms.
- Plan and apply workflow: Preview proposed changes (plan) before committing them (apply).
- State management: Track the current infrastructure state and ensure consistency through Terraform’s state file.
Writing Terraform Configuration
Having laid the groundwork by preparing our environment, writing the application code, and building the Docker image, we’re ready to leverage Terraform to automate the deployment of your Docker image.
1. In your docker-terraform directory, create a new file named main.tf. This file will hold the Terraform configuration code to deploy your Docker image.
2. Specify Docker Provider:
# Specifying Docker providerterraform { required_providers { docker = { source = "kreuzwerker/docker" version = "3.0.2" } }} |
This block tells Terraform to use the docker provider from the source “kreuzwerker/docker” with version 3.0.2. This provider allows Terraform to interact with Docker to manage container deployments.
3. Defining Docker Image Data Source:
data "docker_image" "local_image" { name = "pure_image"} |
This section defines a data source named local_image of type docker_image. Data sources retrieve information from external sources. Here, it retrieves details about a Docker image named “pure_image” that’s assumed to be present locally on your Docker host.
4. Define the Docker Container Resource
The core of the configuration defines the Docker container itself using the docker_container resource:
|
|
This block defines a resource of type docker_container named “pure_app”. The image attribute references the name of the Docker image obtained from the local_image data source. This ensures your container uses the locally available image named “pure_image”. Additionally, the ports block maps the container’s port 5000 (where your Flask application likely runs) to port 5000 on your local machine, allowing external access.
5. Waiting for Container Readiness
This is an optional step to ensure the container is ready before proceeding:
resource "null_resource" "wait_for_container" { depends_on = [docker_container.pure_app] provisioner "local-exec" { command = "sleep 15" }} |
The complete main.tf file should be as follows:
|
|
Deploying Docker Image with Terraform
With our Terraform configuration (main.tf) in place, we can now use the Terraform workflow to deploy the Docker image.
1. Initialize Terraform
Open a terminal in your docker-terraform directory and run the following command:
$ terraform init |
This command initializes Terraform, downloading any necessary plug-ins required for the configuration.
2. Plan the Deployment
Next, run the following command to preview the planned changes Terraform will make:
$ terraform plan |
This command analyzes your configuration and displays a detailed output outlining the infrastructure changes Terraform will implement.
3. Apply the Configuration (Deploy)
Once you’re satisfied with the planned changes, proceed with deploying the infrastructure by running:
$ terraform apply |
This command executes the Terraform configuration, deploying the Docker container based on your specifications.
4. Verify Deployment
After a successful deployment, you can verify that your application is running by opening a web browser and navigating to http://localhost:5000. You should see the “Hello, World!” message displayed by your Flask application.
Congratulations! You’ve successfully built a Docker image and automated the deployment using Terraform.
Ansible vs. Terraform: Is Ansible Necessary with Terraform?
Having explored Terraform for deployment, let’s compare it to Ansible, another popular infrastructure automation tool. While both excel in automation, they have distinct strengths:
Ansible
Ansible offers agentless, configuration management, and orchestration using YAML playbooks. It excels in configuration tasks and application deployment.
Strengths: Easy setup, declarative configuration, configuration drift detection, vast module library
Terraform
Terraform provides an infrastructure-as-code (IaC) approach for provisioning and managing infrastructure. It shines in cloud infrastructure deployments and multi-cloud environments.
Strengths: Declarative configuration, rich provider ecosystem, dependency management, state management
Choosing the Right Tool
The choice depends on your specific needs:
- Nature of tasks: Decide if you need configuration management and application deployment (Ansible) or infrastructure provisioning and management (Terraform).
- Existing environment: Consider existing tools and team expertise.
- Integration needs: Evaluate integration with other tools like CI/CD pipelines and monitoring.
Ansible and Terraform can even be used together. Ansible can manage configurations on resources provisioned by Terraform. This combined approach offers a powerful and flexible solution for infrastructure automation.
Conclusion
Thanks to modern techniques such as containerization using Docker, infrastructure management using Terraform, and container orchestration using Kubernetes, software deployment has become more manageable, consistent, and reproducible. Using these techniques with various other container technologies and DevOps deployment tools, like Portworx® or Pure Cloud Block Store™, ensures resilience in software infrastructure.
In this tutorial, you learned how to use two of these techniques to build and automate the deployment of a container.
![]()